Showing posts with label In-the-Lab. Show all posts

Tuesday, November 16, 2010

In-the-Lab: NexentaStor vs. Grub

In this In-the-Lab segment we're going to look at how to recover from a failed ZFS version update in case you've become ambitious with your NexentaStor installation after the last Short-Take on ZFS/ZPOOL versions. If you used the "root shell" to make those changes, chances are your grub is failing after reboot. If so, this blog can help, but before you read on, observe this necessary disclaimer:
NexentaStor is an appliance operating system, not a general purpose one. The accepted way to manage the system volume is through the NMC shell and NMV web interface. Using a "root shell" to configure the file system(s) is unsupported and may void your support agreement(s) and/or license(s).

That said, let's assume that you updated the syspool filesystem and zpool to the latest versions using the "root shell" instead of the NMC (i.e. following a system update where zfs and zpool warnings declare that your pool and filesystems are too old, etc.) In such a case, the resulting syspool will not be bootable until you update grub (this happens automagically when you use the NMC commands.) When this happens, you're greeted with the following boot prompt:
grub>

Grub is now telling you that it has no idea how to boot your NexentaStor OS. Chances are there are two things that will need to happen before your system boots again:

  1. Your boot archive will need updating, pointing to the latest checkpoint;

  2. Your master boot record (MBR) will need to have grub installed again.


We'll update both in the same recovery session to save time (this assumes you know or have a rough idea about your intended boot checkpoint - it is usually the highest numbered rootfs-nmu-NNN checkpoint, where NNN is a three digit number.) The first step is to load the recovery console. This could have been done from the "Safe Mode" boot menu option if grub was still active. However, since grub is blown-away, we'll boot from the latest NexentaStor CD and select the recovery option from the menu.

Import the syspool


Then, we login as "root" (empty password.) From this "root shell" we can import the existing (disks connected to active controllers) syspool with the following command:
# zpool import -f syspool

Note the use of the "-f" card to force the import of the pool. Chances are, the pool will not have been "destroyed" or "exported" so zpool will "think" the pool belongs to another system (your boot system, not the rescue system). As a precaution, zpool assumes that the pool is still "in use" by the "other system" and the import is rejected to avoid "importing an imported pool" which would be completely catastrophic.

With the syspool imported, we need to mount the correct (latest) checkpointed filesystem as our boot reference for grub, destroy the local zfs.cache file (in case the pool disks have been moved, but still all there), update the boot archive to correspond to the mounted checkpoint and install grub to the disk(s) in the pool (i.e. each mirror member).

List the Checkpoints


# zfs list syspool

From the resulting list, we'll pick our highest-numbered checkpoint; for the sake of this article let's say it's "rootfs-nmu-013" and mount it.

Mount the Checkpoint


# mkdir /tmp/syspool
# mount -F zfs syspool/rootfs-nmu-013 /tmp/syspool

Remove the ZPool Cache File


# cd /tmp/syspool/etc/zfs
# rm -f zpool.cache

Update the Boot Archive


# bootadm update-archive -R /tmp/syspool

Determine the Active Disks


# zpool status syspool

For the sake of this article, let's say the syspool was a three-way mirror and the zpool status returned the following:
  pool: syspool
 state: ONLINE
 scan: resilvered 8.64M in 0h0m with 0 errors on Tue Nov 16 12:34:40 2010
config:
NAME           STATE     READ WRITE CKSUM
        syspool        ONLINE       0     0     0
          mirror-0     ONLINE       0     0     0
            c6t13d0s0  ONLINE       0     0     0
            c6t14d0s0  ONLINE       0     0     0
            c6t15d0s0  ONLINE       0     0     0

errors: No known data errors

This enumerates the three disk mirror as being composed of disks/slices c6t13d0s0, c6t14d0s0 and c6t15d0s0. We'll use that information for the grub installation.

Install Grub to Each Mirror Disk


# cd /tmp/syspool/boot/grub
# installgrub -f -m stage[12] c6t13d0s0
# installgrub -f -m stage[12] c6t14d0s0
# installgrub -f -m stage[12] c6t15d0s0

Unmount and Reboot


# umount /tmp/syspool
# sync
# reboot

Now, the system should be restored to a bootable configuration based on the selected system checkpoint. A similar procedure can be found on Nexenta's site when using the "Safe Mode" boot option. If you follow that process, you'll quickly encounter an error - likely intentional and meant to elicit a call to support for help. See if you can spot the step...

Thursday, September 30, 2010

In-the-Lab: Windows Server 2008 R2 Template for VMware

As it turns out, the reasonably simple act of cloning a Windows Server 2008 R2 (insert addition here) has been complicated by the number of editions, changes from 2008 release through 2008 R2 as well as user profile management changes since its release. If you're like me, you like to tweak your templates to limit customization steps in post-deployment. While most of these customizations can now be setup in group policies from AD, the deployment of non-AD members has become a lot more difficult - especially where custom defaults are needed or required.

Here's my quick recipe to build a custom image of Windows Server 2008 R2 that has been tested with Standard, Enterprise and Foundation editions.

Create VM, use VMXNET3 as NIC(s), 40GB "thin" disk, using 2008 R2 Wizard


This is a somewhat "mix to taste" step. We use ISO images and encourage their use. The size of the OS volume will end-up being somewhere around 8GB of actual space-on-disk after this step, making 40GB sound like overkill. However, the OS volume will bloat-up to 18-20GB pretty quick after updates, roles and feature additions. Adding application(s) will quickly chew-up the rest.

  • Edit Settings... ->

    • Options -> Advanced -> General -> Uncheck "Enable logging"

    • Hardware -> CD/DVD Drive 1 ->

      • Click "Datastore ISO File"

        • Browse to Windows 2008 R2 ISO image


      • Check "Connect at power on"


    • Options -> Advanced -> Boot Options -> Force BIOS Setup

      • Check "The next time the virtual machine boots, force entry into the BIOS setup screen"


  • Power on VM

  • Install Windows Server 2008 R2


Use Custom VMware Tools installation to disable "Shared Folders" feature:


It is important that VMware Tools be installed next, if for no other reason than to make the rest of the process quicker and easier. The additional step of disabling "Shared Folders" is for ESX/vSphere environments where shared folders are not supported. Since this option is installed by default, it can/should be removed in vSphere installations.

  • VM -> Guest -> Install VMware Tools ->

    • Custom -> VMware Device Drivers -> Disable "Shared Folder" feature


  • Retstart


Complete Initial Configuration Tasks:


Once the initial installation is complete, we need to complete the 2008 R2 basic configuration. If you are working in an AD environment, this is not the time to join the template to the domain as GPO conflicts may hinder manual template defaults. We've chosen a minimal package installation based on our typical deployment profile. Some features/roles may differ in your organization's template (mix to taste).

  • Set time zone -> Date and Time ->

    • Internet Time -> Change Settings... -> Set to local time source

    • Date and Time -> Change time zone... -> Set to local time zone


  • Provide computer name and domain -> Computer name ->

    • Enterprise Edition: W2K8R2ENT-TMPL

    • Standard Edition: W2K8R2STD-TMPL

    • Foundation Edition: W2K8R2FND-TMPL

    • Note: Don't join to a domain just yet...


  • Restart Later

  • Configure Networking

    • Disable QoS Packet Scheduler


  • Enable automatic updating and feedback

    • Manually configure settings

      • Windows automatic updating -> Change Setting... ->

        • Important updates -> "check for updates but let me choose whether to download and install them"

        • Recommended updates -> Check "Give me recommended updates the same way I receive important updates"

        • Who can install updates -> Uncheck "Allow all users to install updates on this computer"


      • Windows Error Reporting -> Change Setting... ->

        • Select "I don't want to participate, and don't ask me again"


      • Customer Experience Improvement Program -> Change Setting... ->

        • Select "No, I don't want to participate"


  • Download and install updates

    • Bring to current (may require several reboots)


  • Add features (to taste)

    • .NET Framwork 3.5.1 Feautures

      • Check WCF Activation, Non-HTTP Activation

        • Pop-up: Click "Add Required Features"


    • SNMP Services

    • Telnet Client

    • TFTP Client

    • Windows PowerShell Integrated Scripting Environment (ISE)


  • Check for updates after new features

    • Install available updates


  • Enable Remote Desktop

    • System Properties -> Remote

      • Windows 2003 AD

        • Select "Allow connection sfrom computers running any version of Remote Desktop"


      • Windows 2008 AD (optional)

        • Select "Allow connections only from computers runnign Remote Desktop with Network Level Authentication"


  • Windows Firewall

    • Turn Windows Firewall on of off

      • Home or work location settings

        • Turn off Windows Firewall


      • Public network location settings

        • Turn off Windows Firewall


  • Complete Initial Configuration Tasks

    • Check "Do not show this window at logon" and close


Modify and Silence Server Manager


(Optional) Parts of this step may violate your local security policies, however, it's more than likely that a GPO will ultimately override this configuration. We find it useful to have this disabled for "general purpose" templates - especially in a testing/lab environment where the security measures will be defeated as a matter of practice.

  • Security Information -> Configure IE ESC

    • Select Administrators Off

    • Select Users Off


  • Select "Do not show me this console at logon" and close


Modify Taskbar Properties


Making the taskbar usable for your organization is another matter of taste. We like smaller icons and maximizing desktop utility. We also hate being nagged by the notification area...

  • Right-click Taskbar -> Taskbar and Start Menu Properties ->

    • Taskbar -> Check "Use small icons"

    • Taskbar -> Customize... ->

      • Set all icons to "Only show notifications"

      • Click "Turn system icons on or off"

        • Turn off "Volume"


    • Start Menu -> Customize...

      • Uncheck "Use large icons"


Modify default settings in Control Panel


Some Control Panel changes will help "optimize" the performance of the VM by disabling unnecessary features like screen saver and power management. We like to see our corporate logo on server desktops (regardless of performance implications) so now's the time to make that change as well.

  • Control Panel -> Power Options -> High Performance

    • Change plan settings -> Turn off the display -> Never


  • Control Panel -> Sound ->

    • Pop-up: "Would you like to enable the Windows Audio Service?" - No

    • Sound -> Sounds -> Sound Scheme: No Sounds

    • Uncheck "Play Windows Startup sound"


  • Control Panel -> VMware Tools -> Uncheck "Show VMware Tools in the taskbar"

  • Control Panel -> Display -> Change screen saver -> Screen Saver -> Blank, Wait 10 minutes

  • Change default desktop image (optional)

    • Copy your desktop logo background to a public folder (i.e. "c:\Users\Public\Public Pictures")

    • Control Panel -> Display -> Change desktop background -> Browse...

    • Find picture in browser, Picture position stretch


Disable Swap File


Disabling swap will allow the defragment step to be more efficient and will disable VMware's advanced memory management functions. This is only temporary and we'll be enabling swap right before committing the VM to template.

  • Computer Properties -> Visual Effects -> Adjust for best performance

  • Computer Properties -> Advanced System Settings ->

    • System Properties -> Advanced -> Performance -> Settings... ->

    • Performance Options -> Advanced -> Change...

      • Uncheck "Automatically manage paging file size for all drives"

      • Select "No paging file"

      • Click "Set" to disable swap file


Remove hibernation file and set boot timeout


It has been pointed out that the hibernation and timeout settings will get re-enabled by the sysprep operation. Removing the hibernation files will help in defragment now. We'll reinforce these steps in the customization wizard later.

  • cmd: powercfg -h off

  • cmd: bcdedit /timeout 5


Disable indexing on C:


Indexing the OS disk can suck performance and increase disk I/O unnecessarily. Chances are, this template (when cloned) will be heavily cached on your disk array so indexing in the OS will not likely benefit the template. We prefer to disable this feature as a matter of practice.

  • C: -> Properties -> General ->

    • Uncheck "Allow files on this drive to have contents indexed in addition to file properties"

    • Apply -> Apply changes to C:\ only (or files and folders, to taste)


Housekeeping


Time to clean-up and prepare for a streamlined template. The first step is intended to aid the copying of "administrator defaults" to "user defaults." If this does not apply, just defragment.

Remove "Default" user settings:

  • C:\Users -> Folder Options -> View -> Show hidden files...

  • C:\Users\Default -> Delete "NTUser.*" Delete "Music, Pictures, Saved Games, Videos"


Defragment

  • C: -> Properties -> Tools -> Defragment Now...

    • Select "(C:)"

    • Click "Defragment disk"


Copy Administrator settings to "Default" user


The "formal" way of handling this step requires a third-party utility. We're giving credit to Jason Samuel for consolidating other bloggers methods because he was the first to point out the importance of the "unattend.xml" file and it really saved us some time. His blog post also includes a link to an example "unattend.xml" file that can be modified for your specific use, as we have.

  • Jason Samuel points out a way to "easily" copy Administrator settings to defaults, by activating the CopyProfile node in an "unattend.xml" file used by sysprep.

  • Copy your "unattend.xml" file to C:\windows\system32\sysprep

  • Edit unattend.xml for environment and R2 version

    • Update offline image pointer to correspond to your virtual CD

      • E.g. wim:d:... -> wim:f:...


    • Update OS offline image source pointer, valid sources are:

      • Windows Server 2008 R2 SERVERDATACENTER

      • Windows Server 2008 R2 SERVERDATACENTERCORE

      • Windows Server 2008 R2 SERVERENTERPRISE

      • Windows Server 2008 R2 SERVERENTERPRISECORE

      • Windows Server 2008 R2 SERVERSTANDARD

      • Windows Server 2008 R2 SERVERSTANDARDCORE

      • Windows Server 2008 R2 SERVERWEB

      • Windows Server 2008 R2 SERVERWEBCORE

      • Windows Server 2008 R2 SERVERWINFOUNDATION


    • Any additional changes necessary


  • NOTE: now would be a good time to snapshot/backup the VM

  • cmd: cd \windows\system32\sysprep

  • cmd: sysprep /generalize /oobe /reboot /unattend:unattend.xml

    • Check "Generalize"

    • Shutdown Options -> Reboot


  • Login

  • Skip Activation

  • Administrator defaults are now system defaults


  • Reset Template Name

    • Computer Properties -> Advanced System Settings -> Computer name -> Change...

      • Enterprise Edition: W2K8R2ENT-TMPL

      • Standard Edition: W2K8R2STD-TMPL

      • Foundation Edition: W2K8R2FND-TMPL


    • If this will be an AD member clone, join template to the domain now


    • Restart


  • Enable Swap files

    • Computer Properties -> Advanced System Settings ->

      • System Properties -> Advanced -> Performance -> Settings... ->

      • Performance Options -> Advanced -> Change...

        • Check "Automatically manage paging file size for all drives"


  • Release IP

    • cmd: ipconfig /release


  • Shutdown

  • Convert VM to template


Convert VM Template to Clone


Use the VMware Customization Wizard to create a re-usable script for cloning the template. Now's a good time to test that your template will create a usable clone. If it fails, go check the "red letter" items and make sure your setup is correct. The following hints will help improve your results.

  • Remove hibernation related files and reset boot delay to 5 seconds in Customization Wizard


  • Remember that the ISO is still mounted by default. Once VM's are deployed from the template, it should be removed after the customization process is complete and additional roles/features are added.


That's the process we have working at SOLORI. It's not rocket science, but if you miss an important step you're likely to be visited by an error in "pass [specialize]" that will have you starting over. Note: this also happens when your AD credentials are bad, your license key is incorrect (version/edition mismatch, typo, etc.) or other nondescript issues - too bad the error code is unhelpful...

Wednesday, August 11, 2010

VMware Management Assistant Panics on Magny Cours

VMware's current version of its vSphere Management Assistant - also known as vMA (pronounced "vee mah") - will crash when run on an ESX host using AMD Magny Cours processors. This behavior was discovered recently when installing the vMA on an AMD Opteron 6100 system (aka. Magny Cours) causing a "kernel panic" on boot after deploying the OVF template. Something of note is the crash also results in 100% vCPU utilization until the VM is either powered-off or reset:

[caption id="attachment_1624" align="aligncenter" width="436" caption="vMA Kernel Panic on Import"]vMA Kernel Panic on Import[/caption]

As it turns out, no manner of tweaks to the virtual machine's virtualization settings nor OS boot/grub settings (i.e. noapic, etc.) seem to cure the ills for vMA. However, we did discover that the OVF deployed appliance was configured as a VMware Virtual Machine Hardware Version 4 machine:

[caption id="attachment_1625" align="aligncenter" width="450" caption="vMA 4.1 defaults to Virtual Machine Hardware Version 4"]vMA 4.1 defaults to Hardware Version 4[/caption]

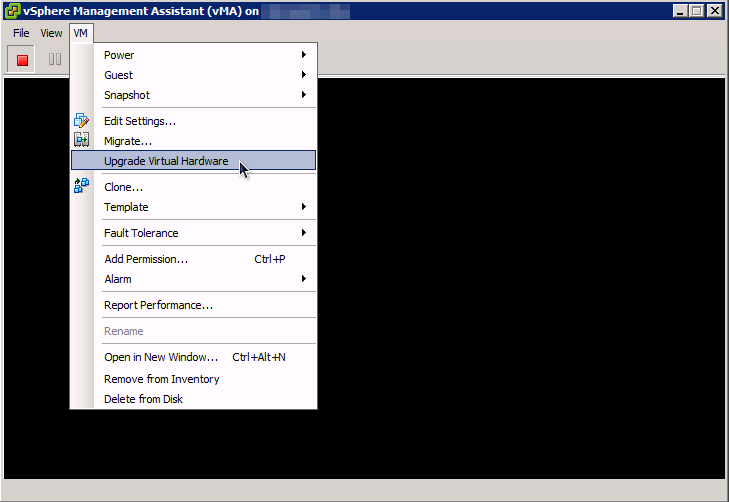
Since our lab vMA deployments have all been upgraded to Virtual Machine Harware Version 7 for some time (and for functional benefits as well), we tried to update the vMA to Version 7 and try again:

[caption id="attachment_1626" align="aligncenter" width="450" caption="Upgrade vMA Virtual Machine Version..."]Upgrade vMA Virtual Machine Version...[/caption]

This time, with Virtual Hardware Version 7 (and no other changes to the VM), the vMA boots as it should:

[caption id="attachment_1627" align="aligncenter" width="450" caption="vMA Booting after Upgrade to Virtual Hardware Version 7"]vMA Booting after Upgrade to Virtual Hardware Version 7[/caption]

Since the Magny Cours CPU is essentially a pair of tweaked 6-core Opteron CPUs in a single package, we took the vMA into the lab and deployed it to an ESX server running on AMD 2435 6-core CPUs: the vMA booted as expected, even with Virtual Hardware Version 4. A quick check of the community and support boards show a few issues with older RedHat/Centos kernels (like vMA's) but no reports of kernel panic with Magny Cours. Perhaps there are just not that many AMD Opteron 6100 deployments out there with vMA yet...

Thursday, July 15, 2010

ZFS Pool Import Fails After Power Outage

The early summer storms have taken its toll on Alabama and UPS failures (and short-falls) have been popping-up all over. Add consolidated, shared storage to the equation and you have a recipe for potential data loss - at least this is what we've been seeing recently. Add JBOD's with separate power rails and limited UPS life-time and/or no generator backup and you've got a recipe for potential data loss.


Even with ZFS pools, data integrity in a power event cannot be guaranteed - especially when employing "desktop" drives and RAID controllers with RAM cache and no BBU (or perhaps a "bad storage admin" that has managed to disable the ZIL). When this happens, NexentaStor (an other ZFS storage devices) may even show all members in the ZFS pool as "ONLINE" as if they are awaiting proper import. However, when an import is attempted (either automatically on reboot or manually) the pool fails to import.


From the command line, the suspect pool's status might look like this:


root@NexentaStor:~# zpool import
pool: pool0
id: 710683863402427473
state: ONLINE
action: The pool can be imported using its name or numeric identifier.
config:
        pool0        ONLINE
          mirror-0   ONLINE
            c1t12d0  ONLINE
            c1t13d0  ONLINE
          mirror-1   ONLINE
            c1t14d0  ONLINE
            c1t15d0  ONLINE

Looks good, but the import it may fail like this:

root@NexentaStor:~# zpool import pool0
cannot import 'pool0': I/O error

Not good. This probably indicates that something is not right with the array. Let's try to force the import and see what happens:


Nope. Now this is the point where most people start to get nervous, their neck tightens-up a bit and they begin to flip through a mental calendar of backup schedules and catalog backup repositories - I know I do. However, it's the next one that makes most administrators really nervous when trying to "force" the import:


root@NexentaStor:~# zpool import -f pool0
pool: pool0
id: 710683863402427473
status: The pool metadata is corrupted and the pool cannot be opened.
action: Restore the file in question if possible.  Otherwise restore the
entire pool from backup.
cannot import 'pool0': I/O error


Really not good. Did it really suggest going to backup? Ouch!.


In this case, something must have happened to corrupt metadata - perhaps the non-BBU cache on the RAID device when power failed. Expensive lesson learned? Not yet. The ZFS file system still presents you with options, namely "acceptable data loss" for the period of time accounted for in the RAID controller's cache. Since ZFS writes data in transaction groups and transaction groups normally commit in 20-30 second intervals, that RAID controller's lack of BBU puts some or all of that pending group at risk. Here's how to tell by testing the forced import as if data loss was allowed:


root@NexentaStor:~# zpool import -nfF pool0
Would be able to return data to its state as of Fri May 7 10:14:32 2010.
Would discard approximately 30 seconds of transactions.


or

root@NexentaStor:~# zpool import -nfF pool0
WARNING: can't open objset for pool0

If the first output is acceptable, then proceeding without the "n" option will produce the desired effect by "rewinding" the last couple of transaction groups (read ignoring) and imported the "truncated" pool. The "import" option will report the exact number of "seconds" worth of data that cannot be restored. Depending on the bandwidth and utilization of your system, this could be very little data or several MB worth of transaction(s).


What to do about the second option? From the man pages on "zpool import" Sun/Oracle says the following:


zpool import [-o mntopts] [ -o property=value] ... [-d dir | -c cachefile] [-D] [-f] [-R root] [-F [-n]]-a
Imports all pools found in the search directories. Identical to the previous command, except that all pools with a sufficient number of devices available are imported. Destroyed pools, pools that were previously destroyed with the “zpool destroy” command, will not be imported unless the-D option is specified.


-o mntopts
Comma-separated list of mount options to use when mounting datasets within the pool. See zfs(1M) for a description of dataset properties and mount options.

-o property=value
Sets the specified property on the imported pool. See the “Properties” section for more information on the available pool properties.

-c cachefile
Reads configuration from the given cachefile that was created with the “cachefile” pool property. This cachefile is used instead of searching for devices.

-d dir
Searches for devices or files in dir. The -d option can be specified multiple times. This option is incompatible with the -c option.

-D
Imports destroyed pools only. The -f option is also required.

-f
Forces import, even if the pool appears to be potentially active.

-F
Recovery mode for a non-importable pool. Attempt to return the pool to an importable state by discarding the last few transactions. Not all damaged pools can be recovered by using this option. If successful, the data from the discarded transactions is irretrievably lost. This option is ignored if the pool is importable or already imported.

-a
Searches for and imports all pools found.

-R root
Sets the “cachefile” property to “none” and the “altroot” property to “root”.

-n
Used with the -F recovery option. Determines whether a non-importable pool can be made importable again, but does not actually perform the pool recovery. For more details about pool recovery mode, see the -F option, above.


No real help here. What the documentation omits is the "-X" option. This option is only valid with the "-F" recovery mode setting, however it is NOT well documented suffice to say it is the last resort before acquiescing to real problem solving... Assuming the standard recovery mode "depth" of transaction replay is not quite enough to get you over the hump, the "-X" option gives you an "extended replay" by seemingly providing a scrub-like search through the transaction groups (read "potentially time consuming") until it arrives at the last reliable transaction group in the dataset.

Lessons to be learned from this excursion into pool recovery are as follows:


  1. Enterprise SAS good; desktop SATA could be a trap

  2. Redundant Power + UPS + Generator = Protected; Anything else = Risk

  3. SAS/RAID Controller + Cache + BBU = Fast; SAS/RAID Controller + Cache - BBU = Train Wreck


The data integrity functions in ZFS are solid when used appropriately. When architecting your HOME/SOHO/SMB NAS appliance, pay attention to the hidden risks of "promised performance" that may walk you down the plank towards a tape backup (or resume writing) event. Better to leave the 5-15% performance benefit on the table or purchase adequate BBU/UPS/Generator resources to supplant your system in worst-case events. In complex environments, a pending power loss can be properly mitigated through management supervisors and clever scripts: turning down resources in advance of total failure. How valuable is your data???

Thursday, June 17, 2010

In-the-Lab: Install VMware Tools on NexentaStor VSA

Physical lab resources can be a challenge to "free-up" just to test a potential storage appliance. With NexentaStor, you can download a pre-configured VMware (or Xen) appliance from NexentaStor.Org, but what if you want to build your own? Here's a little help on the subject:

  1. Download the ISO from NexentaStor.Org (see link above);

  2. Create a VMware virtual machine:

    1. 2 vCPU

    2. 4GB RAM (leaves about 3GB for ARC);

    3. CD-ROM (mapped to the ISO image);

    4. One (optionally two if you want to simulate the OS mirror) 4GB, thin provisioned SCSI disks (LSI Logic Parallel);

    5. Guest Operating System type: Sun Solaris 10 (64-bit)

    6. One E1000 for Management/NAS

    7. (optional) One E1000 for iSCSI


  3. Streamline the guest by disabling unnecessary components:

    1. floppy disk

    2. floppy controller (remove from BIOS)

    3. primary IDE controller (remove from BIOS)

    4. COM ports (remove from BIOS)

    5. Parallel ports (remove from BIOS)


  4. Boot to ISO and install NexentaStor CE

    1. (optionally) choose second disk as OS mirror during install


  5. Register your installation with Nexenta

    1. http://www.nexenta.com/register-eval

    2. (optional) Select "Solori" as the partner


  6. Complete initial WebGUI configuration wizard

    1. If you will join it to a domain, use the domain FQDN (i.e. microsoft.msft)

    2. If you choose "Optimize I/O performance..." remember to re-enable ZFS intent logging under Settings>Preferences>System

      1. Sys_zil_disable = No


  7. Shutdown the VSA

    1. Settings>Appliance>PowerOff


  8. Re-direcect the CD-ROM

    1. Connect to Client Device


  9. Power-on the VSA and install VMware Tools

    1. login as admin

      1. assume root shell with "su" and root password


    2. From vSphere Client, initiate the VMware Tools install

    3. cd /tmp

      1. untar VMware Tools with "tar zxvf  /media/VMware\ Tools/vmware-solaris-tools.tar.gz"


    4. cd to /tmp/vmware-tools-distrib

      1. install VMware Tools with "./vmware-install.pl"

      2. Answer with defaults during install


    5. Check that VMware Tools shows and OK status

      1. IP address(es) of interfaces should now be registered

        [caption id="attachment_1580" align="aligncenter" width="300" caption="VMware Tools are registered."][/caption]


  10. Perform a test "Shutdown" of your VSA

    1. From the vSphere Client, issue VM>Power>Shutdown Guest

      [caption id="attachment_1581" align="aligncenter" width="300" caption="System shutting down from VMware Tools request. "][/caption]

    2. Restart the VSA...

      [caption id="attachment_1582" align="aligncenter" width="300" caption="VSA restarting in vSphere "][/caption]


Now VMware Tools has been installed and you're ready to add more virtual disks and build ZFS storage pools. If you get a warning about HGFS not loading properly at boot time:

[caption id="attachment_1586" align="aligncenter" width="300" caption="HGFS module mismatch warning."][/caption]

it is not usually a big deal, but the VMware Host-Guest File System (HGFS) has been known to cause issues in some installations. SInce the NexentaStor appliance is not a general purpose operating system, you should customize the install to not use HGFS at all. To disable it, perform the following:

  1. Edit "/kernel/drv/vmhgfs.conf"

    1. Change:     name="vmhgfs" parent="pseudo" instance=0;

    2. To:     #name="vmhgfs" parent="pseudo" instance=0;


  2. Re-boot the VSA


Upon reboot, there will be no complaint about the offending HGFS module. Remember that, after updating VMware Tools at a future date, the HGFS configuration file will need to be adjusted again. By the way, this process works just as well on the NexentaStor Commercial edition, however you might want to check with technical support prior to making such changes to a licensed/supported deployment.

Tuesday, August 18, 2009

In-the-Lab: Full ESX/vMotion Test Lab in a Box, Part 2

In Part 1 of this series we introduced the basic Lab-in-a-Box platform and outlined how it would be used to provide the three major components of a vMotion lab: (1) shared storage, (2) high speed network and (3) multiple ESX hosts. If you have followed along in your lab, you should now have an operating VMware ESXi 4 system with at least two drives and a properly configured network stack.

In Part 2 of this series we're going to deploy a Virtual Storage Appliance (VSA) based on an open storage platform which uses Sun's Zetabyte File System (ZFS) as its underpinnings. We've been working with Nexenta's NexentaStor SAN operating system for some time now and will use it - with its web-based volume management - instead of deploying OpenSolaris and creating storage manually.

Part 2, Choosing a Virtual Storage Architecture


To get started on the VSA, we want to identify some key features and concepts that caused us to choose NexentaStor over a myriad of other options. These are:

  • NexentaStor is based on open storage concepts and licensing;

  • NexentaStor comes in a "free" developer's version with 4TB 2TB of managed storage;

  • NexentaStor developer's version includes snapshots, replication, CIFS, NFS and performance monitoring facilities;

  • NexentaStor is available in a fully supported, commercially licensed variant with very affordable $/TB licensing costs;

  • NexentaStor has proven extremely reliable and forgiving in the lab and in the field;

  • Nexenta is a VMware Technology Alliance Partner with VMware-specific plug-ins (commercial product) that facilitate the production use of NexentaStor with little administrative input;

  • Sun's ZFS (and hence NexentaStor) was designed for commodity hardware and makes good use of additional RAM for cache as well as SSD's for read and write caching;

  • Sun's ZFS is designed to maximize end-to-end data integrity - a key point when ALL system components live in the storage domain (i.e. virtualized);

  • Sun's ZFS employs several "simple but advanced" architectural concepts that maximize performance capabilities on commodity hardware: increasing IOPs and reducing latency;


While the performance features of NexentaStor/ZFS are well outside the capabilities of an inexpensive "all-in-one-box" lab, the concepts behind them are important enough to touch on briefly. Once understood, the concepts behind ZFS make it a compelling architecture to use with virtualized workloads. Eric Sproul has a short slide deck on ZFS that's worth reviewing.

ZFS and Cache - DRAM, Disks and SSD's


Legacy SAN architectures are typically split into two elements: cache and disks. While not always monolithic, the cache in legacy storage typically are single-purpose pools set aside to hold frequently accessed blocks of storage - allowing this information to be read/written from/to RAM instead of disk. Such caches are generally very expensive to expand (when possible) and may only accomodate one specific cache function (i.e. read or write, not both). Storage vendors employ many strategies to "predict" what information should stay in cache and how to manage it to effectively improve overall storage throughput.

[caption id="attachment_968" align="aligncenter" width="405" caption="New cache model used by ZFS allows main memory and fast SSDs to be used as read cache and write cache, reducing the need for large DRAM cache facilities."]New cache model used by ZFS allows main memory and fast SSDs to be used as read cache and write cache, reducing the need for large DRAM cache facilities.[/caption]

Monday, August 17, 2009

In-the-Lab: Full ESX/vMotion Test Lab in a Box, Part 1

There are many features in vSphere worth exploring but to do so requires committing time, effort, testing, training and hardware resources. In this feature, we'll investigate a way - using your existing VMware facilities - to reduce the time, effort and hardware needed to test and train-up on vSphere's ESXi, ESX and vCenter components. We'll start with a single hardware server running VMware ESXi free as the "lab mule" and install everything we need on top of that system.

Part 1, Getting Started


To get started, here are the major hardware and software items you will need to follow along:

ESX-hardwareRecommended Lab Hardware Components


  • One 2P, 6-core AMD "Istanbul" Opteron system

  • Two 500-1,500GB Hard Drives

  • 24GB DDR2/800 Memory

  • Four 1Gbps Ethernet Ports (4x1, 2x2 or 1x4)

  • One 4GB SanDisk "Cruiser" USB Flash Drive

  • Either of the following:

    • One CD-ROM with VMware-VMvisor-Installer-4.0.0-164009.x86_64.iso burned to it

    • An IP/KVM management card to export ISO images to the lab system from the network


Recommended Lab Software Components


  • One ISO image of NexentaStor 2.x (for the Virtual Storage Appliance, VSA, component)

  • One ISO image of ESX 4.0

  • One ISO image of ESXi 4.0

  • One ISO image of VCenter Server 4

  • One ISO image of Windows Server 2003 STD (for vCenter installation and testing)


For the hardware items to work, you'll need to check your system components against the VMware HCL and community supported hardware lists. For best results, always disable (in BIOS) or physically remove all unsupported or unused hardware- this includes communication ports, USB, software RAID, etc. Doing so will reduce potential hardware conflicts from unsupported devices.

The Lab Setup


We're first going to install VMware ESXi 4.0 on the "test mule" and configure the local storage for maximum use. Next, we'll create three (3) machines two create our "virtual testing lab" - deploying ESX, ESXi and NexentaStor running directly on top of our ESXi "test mule." All subsequent tests VMs will be running in either of the virtualized ESX platforms from shared storage provided by the NexentaStor VSA.

[caption id="attachment_929" align="aligncenter" width="450" caption="ESX, ESXi and VSA running atop ESXi"]ESX, ESXi and VSA running atop ESXi[/caption]

Next up, quick-and-easy install of ESXi to USB Flash...

Friday, July 24, 2009

In The Lab: vSphere DPM, Quirky but Functional

[caption id="attachment_821" align="alignright" width="278" caption="ESX Hosts in Standby Using DRS's DPM Extension"]ESX Hosts in Standby Using DRS's DPM Extension[/caption]

It would be hard to complain that virtualization is contributing to any kind of "global warming" hysteria. In fact and by its very consolidating nature, virtualization offers many advantages over "traditional" computing models that make it "green" even in its most basic format. VMware reinforces this argument with the claims that "every server that is virtualized saves 7,000 kWh of electricity and four tons of carbon dioxide emissions per year."

However, virtualization's promise was born out of the recognition that x86 servers were commonly operating with enormous "excess capacity." In typical deployments, virtual servers are driven to only 30-40% of capacity, and where excess capacity abounds, there exists a potential for slashing available resources in a quest for limiting on-line power consumption.

Enter VMware's power saving extension to its Distributed Resource Scheduler (DRS) that scrubs VMware clusters for unused capacity, automatically consolidates stray virtual machines away from near-idle members and shuts those members down to conserve power. This magic green genie is called Distributed Power Management (DPM) and, while simple to configure, has a few quirks that not only hinder its effectiveness but actually make no sense (more on that later).

[caption id="attachment_833" align="aligncenter" width="350" caption="DRS's DPM In Action"]DRS's DPM In Action[/caption]
"VMware DPM monitors the cumulative demand of all virtual machines in the cluster for memory and CPU resources and compares this to the total available resource capacity of all hosts in the cluster. If sufficient excess capacity is found, VMware DPM places one or more hosts in standby mode and powers them off after migrating their virtual machines to other hosts. Conversely, when capacity is deemed to be inadequate, DRS brings hosts out of standby mode (powers them on) and migrates virtual machines, using VMotion, to them. When making these calculations, VMware DPM considers not only current demand, but it also honors any user-specified virtual machine resource reservations."

vSphere Resource Management Guide, Managing Power Resources

Thursday, May 21, 2009

Quick Take: AMD Istanbul Update

AMD was gracious enough to invite us to their Reviewer's Day on May 20th to have a final look at "Istanbul" and discuss their plans for the product's upcoming release. While much of the information we received is embargoed until the June, 2009 release date, we can tell you that we've have received a couple of AMD's new 6-core "Istanbul" Opterons for testing and review. We'll look forward to seeing "Istanbul" in action inside our lab over the next couple of weeks. Our verdict will be available at launch.

Instead of typical benchmarks, we'll be focusing on Istanbul's implications for vSphere before the new Opteron hits the streets (remember 6-core is the limit for "free" and "reduced capability" vSphere license). If what we saw from AMD's internal testing at Reviewer's Day is accurate , then our AMD/VMware Eco-System partners are going to be very happy with the results. What we can confirm today is that AGESA 3.3.0.3+ 3.5.0.0+ is required to run Istanbul, so start looking for BIOS updates from your vendors as the launch date approaches. The systems we reported on from Tyan back in April will be good-to-go at launch (our GT28 test systems are already running it require a beta BIOS).

SOLORI's take: We made a somewhat bold prediction on April 30, 2009 that "Shanghai-Istanbul Eco-System looks like an economic stimulus all its own" when comparing the AMD upgrade path to Intel's (rip and replace) where VMware infrastructures are concerned. That article, Shanghai Economics 101, was one of our most popular AMD-related postings yet, and - judging from what we've seen already - it looks like we may have been correct!

While we're impressed with the ability to flawlessly vMotion from socket 940 to socket-F, we were more impressed with the ability to insert an Istanbul into a Barcelona or Shanghai system and immediately realize the benefits. We're going to look at our review samples, revisit our price-performance data and Watt/VM calculations before making sweeping recommendation. However, we expect to find Istanbul to be a very good match to on-premise cloud/virtualization initiatives.

SOLORI's 2nd take: VDI and databased consolidation systems running on 4P AMD boxes are about to take a giant leap forward. We can't wait to see 24-core and 48-core VMmark scores updated over the next two months. Start asking your system vendor for updated BIOS supporting AGESA 3.5.0.0+ (Tyan are you listening? Supermicro's AS2041M is already there), and get your 4P test mule updated and prepare to be amazed...

Friday, April 10, 2009

Installing OpManage 8.0 on SLES 10 SP2

Network and device managers abound, but the OpManage platform from AdventNet keeps building features and capabilities. Unfortunately, their embrace of Windows and Linux installation choices leaves some in the lurch depending on the platform chosen.

Recently I took version 8.0 for a spin on a trimmed-down installation of SLES 10 SP2. As has been typical with this platform on Suse systems, there were some issues requiring resolution before OpManager was up an running. Fortunately, the issues were localized to the apache server that comes with OM8.

First up, in my trimmed-down install (minimal X-windows, no additional servers), no Apache was included as a SLES package (i.e. in an attempt to avoid package collision). This required the following changes to the SLES environment after OM8 installation:
create file: /etc/ld.so.cond.d/opmanage.conf
   edit, add:  /opt/AdventNet/ME/OpManager/apache/lib
run: ldconfig

Next, trouble-shooting the remainder of the apache-related issues uncovered the following dependencies:
create link:  ln -s /usr/lib/libgdbm.so.3 /usr/lib/libgdbm.so.2
create link:  ln -s /usr/lib/libdb-4.3.so /usr/lib/libdb-3.2.so
create link:  ln -s /usr/lib/libexpat.so /usr/lib/libexpat.so.0

Once completed, test the service by issuing the following:
cd /opt/AdventNet/ME/OpManager/bin
run  ./StartOpManagerServer.sh

OpManager will point-out the service port you chose during installation. Remember SUSE's firewall services manager if you get stuck accessing OpManager from the "web client" - it is deny-all by default when enabled.

From the first 15-minutes with the new OpManager, it is clear that AdventNet has come a long way since the early days of the product. There are many new features and devices supported. Check it out for yourself if you're still shopping for a network/server monitoring system that runs nicely in a virtual machine...

Tuesday, March 17, 2009

In-the-Lab: VSA Shoot-out

We're cooking with gas over the next two weeks, making performance contrasts using similar resource build-outs of:

  1. FreeNAS (0.7 nightly build)

  2. OpenFiler 2.3

  3. NexentaStor (1.1.5 dev)

  4. SunStorage (VSA)


All configured as VSA's under ESXi with pass-thru access to local attached storage. Why do this? ESX provides some supervisory analysis that makes quick lab analysis easy. Also, VSA storage is a 2009 killer-app and absolutely necessary for targeted micro-deployments.

These are not indepth storage studys, but an out-of-the-box analysis of what to expect and where to spend your time=money. Stay tuned...