Showing posts with label VMWare. Show all posts

Monday, November 8, 2010

Short-Take: vSphere Multi-core Virtual Machines

Virtual machines were once relegated to a second class status of single-core vCPU configurations. To get multiple process threads, you had to add to add one "virtual CPU" for each thread. This approach, while functional, had potential serious software licensing ramifications. This topic drew some attention on Jason Boche's blog back in July, 2010 with respect to vSphere 4.1.

With vSphere 4U2 and vSphere 4.1 you have the option of using an advanced configuration setting to change the "virtual cores per socket" to allow thread count needs to have a lesser impact on OS and application licensing. The advanced configuration parameter name is "cpuid.coresPerSocket" (default 1) and acts as a divisor for the virtual hardware setting "CPUs" which must be an integral multiple of the "cpuid.coresPerSocket" value. More on the specifics and limitations of this setting can be found in "Chapter 7, Configuring Virtual Machines" (page 79) of the vSphere Virtual Machine Administrator Guide for vSphere 4.1. [Note: See also VMware KB1010184.]

The value of "cpuid.coresPerSocket" is effectively ignored when "CPUs" is set to 1. In case "cpuid.coresPerSocket" is an imperfect divisor, the power-on operation will fail with the following message in the VI Client's task history:

[caption id="attachment_1726" align="aligncenter" width="328" caption="Virtual core count is imperfect divisor of CPUs"]Power-on-Fail[/caption]

If virtual machine logging is enabled, the following messages (only relevant items listed) will appear in the VM's log (Note: CPUs = 3, cpuid.coresPerSocket = 2):
Nov 08 14:17:43.676: vmx| DICT         virtualHW.version = 7
Nov 08 14:17:43.677: vmx| DICT                  numvcpus = 3
Nov 08 14:17:43.677: vmx| DICT      cpuid.coresPerSocket = 2
Nov 08 14:17:43.727: vmx| VMMon_ConfigMemSched: vmmon.numVCPUs=3
Nov 08 14:17:43.799: vmx| NumVCPUs 3
Nov 08 14:17:44.008: vmx| Msg_Post: Error
Nov 08 14:17:44.008: vmx| [msg.cpuid.asymmetricalCores] The number of VCPUs is not a multiple of the number of cores per socket of your VM, so it cannot be powered on.----------------------------------------
Nov 08 14:17:44.033: vmx| Module CPUID power on failed.

While the configuration guide clearly states (as Jason Boche rightly pointed out in his blog):
The number of virtual CPUs must be divisible by the number of cores per socket. The coresPerSocketsetting must be a power of two.

- Virtual Machine Configuration Guide, vSphere 4.1


We've found that "cpuid.coresPerCPU" simply needs to be a perfect divisor of the "CPUs" value. This tracks much better with prior versions of vSphere where "odd numbered" socket/CPU counts were allowed, so therefore odd numbers of cores-per-CPU allowed provided the division of CPUs by coresPerCPU is integral. Suffice to say, if the manual says "power of two" (1, 2, 4, 8, etc.)  then those are likely the only "supported" configuration available. Any other configuration that "works" (i.e. 3, 5, 6, 7, etc.) will likely be unsupported by VMware in the event of a problem.

That said, odd values of "cpuid.coresPerCPU" do work just fine. Since SOLORI has a large number of AMD-only eco-systems, it is useful to test configurations that match the physical core count of the underlying processors (i.e. 2, 3, 4, 6, 8, 12). For instance, we were able to create a single, multi-core virtual CPU with 3-cores (CPUs = 3, cpuid.coresPerSocket = 3) and run Windows Server 2003 without incident:

[caption id="attachment_1727" align="aligncenter" width="403" caption="Windows Server 2003 with virtual "tri-core" CPU"]Virtual Tri-core CPU[/caption]

It follows, then, that we were likewise able to run a 2P virtual machine with a total of 6-cores (3-per CPU) running the same installation of Windows Server 2003 (CPUs = 6, cpuid.coresPerSocket = 3):

[caption id="attachment_1728" align="aligncenter" width="403" caption="Virtual Dual-processor (2P), Tri-core (six cores total)"]2P Virtual Tri-core[/caption]

Here are the relevant vmware log messages associated with this 2P, six total core virtual machine boot-up:
Nov 08 14:54:21.892: vmx| DICT         virtualHW.version = 7
Nov 08 14:54:21.893: vmx| DICT                  numvcpus = 6
Nov 08 14:54:21.893: vmx| DICT      cpuid.coresPerSocket = 3
Nov 08 14:54:21.944: vmx| VMMon_ConfigMemSched: vmmon.numVCPUs=6
Nov 08 14:54:22.009: vmx| NumVCPUs 6
Nov 08 14:54:22.278: vmx| VMX_PowerOn: ModuleTable_PowerOn = 1
Nov 08 14:54:22.279: vcpu-0| VMMon_Start: vcpu-0: worldID=530748
Nov 08 14:54:22.456: vcpu-1| VMMon_Start: vcpu-1: worldID=530749
Nov 08 14:54:22.487: vcpu-2| VMMon_Start: vcpu-2: worldID=530750
Nov 08 14:54:22.489: vcpu-3| VMMon_Start: vcpu-3: worldID=530751
Nov 08 14:54:22.489: vcpu-4| VMMon_Start: vcpu-4: worldID=530752
Nov 08 14:54:22.491: vcpu-5| VMMon_Start: vcpu-5: worldID=530753

It's clear from the log that each virtual core spawns a new virtual machine monitor thread within the VMware kernel. Confirming the distribution of cores from the OS perspective is somewhat nebulous due to the mismatch of the CPU's ID (follows the physical CPU on the ESX host) and the "arbitrary" configuration set through the VI Client. CPU-z shows how this can be confusing:

[caption id="attachment_1729" align="aligncenter" width="407" caption="CPU#1 as described by CPU-z"]CPU-z output, 1 of 2[/caption]

[caption id="attachment_1730" align="aligncenter" width="406" caption="CPU#2 as described by CPU-z"]CPU-z CPU 2 of 2[/caption]

Note that CPU-z identifies the first 4-cores with what it calls "Processor #1" and the remaining 2-cores with "Processor #2" - this appears arbitrary due to CPU-z's "knowledge" of the physical CPU layout. In (virtual) reality, this assessment by CPU-z is incorrect in terms of cores per CPU, however it does properly demonstrate the existence of two (virtual) CPUs. Here's the same VM with a "cpuid.coresPerSocket" of 6 (again, not 1, 2, 4 or 8 as supported ):

[caption id="attachment_1731" align="aligncenter" width="405" caption="CPU-z demonstrating a 1P, six-core virtual CPU"]Single 6-core (virtual) CPU[/caption]

Note again that CPU-z correctly identifies the underlying physical CPU as an Opteron 2376 (2.3GHz quad-core) but shows 6-cores, 6-threads as configured through VMware. Note also that the "grayed-out" selection for "Processor #1" demonstrates a single processor is enumerated in virtual hardware. [Note: VMware's KB1030067 demonstrates accepted ways of verifying cores per socket in a VM.)

How does this help with per-CPU licensing in a virtual world? It effectively evens the playing field between physical and virtual configurations. In the past (VI3 and early vSphere 4) multiple virtual threads were only possible through the use of additional virtual sockets. This paradigm did not track with OS licensing and CPU-socket-aware application licensing since the OS/applications would recognize the additional threads as CPU sockets in excess of the license count.

With virtual cores, the underlying CPU configuration (2P, 12 total cores, etc.) can be emulated to the virtual machine layer and deliver thread-count parity to the virtual machine. Since most per-CPU licenses speak to the physical hardware layer, this allows for parity between the ESX host CPU count and the virtual machine CPU count, regardless of the number of physical cores.

Also, in NUMA systems where core/socket/memory affinity is a potential performance issue, addressing physical/virtual parity is potentially important. This could have performance implications for AMD 2400/6100 and Intel 5600 systems where 6 and 12 cores/threads are delivered per physical CPU socket.

Thursday, September 30, 2010

In-the-Lab: Windows Server 2008 R2 Template for VMware

As it turns out, the reasonably simple act of cloning a Windows Server 2008 R2 (insert addition here) has been complicated by the number of editions, changes from 2008 release through 2008 R2 as well as user profile management changes since its release. If you're like me, you like to tweak your templates to limit customization steps in post-deployment. While most of these customizations can now be setup in group policies from AD, the deployment of non-AD members has become a lot more difficult - especially where custom defaults are needed or required.

Here's my quick recipe to build a custom image of Windows Server 2008 R2 that has been tested with Standard, Enterprise and Foundation editions.

Create VM, use VMXNET3 as NIC(s), 40GB "thin" disk, using 2008 R2 Wizard


This is a somewhat "mix to taste" step. We use ISO images and encourage their use. The size of the OS volume will end-up being somewhere around 8GB of actual space-on-disk after this step, making 40GB sound like overkill. However, the OS volume will bloat-up to 18-20GB pretty quick after updates, roles and feature additions. Adding application(s) will quickly chew-up the rest.

  • Edit Settings... ->

    • Options -> Advanced -> General -> Uncheck "Enable logging"

    • Hardware -> CD/DVD Drive 1 ->

      • Click "Datastore ISO File"

        • Browse to Windows 2008 R2 ISO image


      • Check "Connect at power on"


    • Options -> Advanced -> Boot Options -> Force BIOS Setup

      • Check "The next time the virtual machine boots, force entry into the BIOS setup screen"


  • Power on VM

  • Install Windows Server 2008 R2


Use Custom VMware Tools installation to disable "Shared Folders" feature:


It is important that VMware Tools be installed next, if for no other reason than to make the rest of the process quicker and easier. The additional step of disabling "Shared Folders" is for ESX/vSphere environments where shared folders are not supported. Since this option is installed by default, it can/should be removed in vSphere installations.

  • VM -> Guest -> Install VMware Tools ->

    • Custom -> VMware Device Drivers -> Disable "Shared Folder" feature


  • Retstart


Complete Initial Configuration Tasks:


Once the initial installation is complete, we need to complete the 2008 R2 basic configuration. If you are working in an AD environment, this is not the time to join the template to the domain as GPO conflicts may hinder manual template defaults. We've chosen a minimal package installation based on our typical deployment profile. Some features/roles may differ in your organization's template (mix to taste).

  • Set time zone -> Date and Time ->

    • Internet Time -> Change Settings... -> Set to local time source

    • Date and Time -> Change time zone... -> Set to local time zone


  • Provide computer name and domain -> Computer name ->

    • Enterprise Edition: W2K8R2ENT-TMPL

    • Standard Edition: W2K8R2STD-TMPL

    • Foundation Edition: W2K8R2FND-TMPL

    • Note: Don't join to a domain just yet...


  • Restart Later

  • Configure Networking

    • Disable QoS Packet Scheduler


  • Enable automatic updating and feedback

    • Manually configure settings

      • Windows automatic updating -> Change Setting... ->

        • Important updates -> "check for updates but let me choose whether to download and install them"

        • Recommended updates -> Check "Give me recommended updates the same way I receive important updates"

        • Who can install updates -> Uncheck "Allow all users to install updates on this computer"


      • Windows Error Reporting -> Change Setting... ->

        • Select "I don't want to participate, and don't ask me again"


      • Customer Experience Improvement Program -> Change Setting... ->

        • Select "No, I don't want to participate"


  • Download and install updates

    • Bring to current (may require several reboots)


  • Add features (to taste)

    • .NET Framwork 3.5.1 Feautures

      • Check WCF Activation, Non-HTTP Activation

        • Pop-up: Click "Add Required Features"


    • SNMP Services

    • Telnet Client

    • TFTP Client

    • Windows PowerShell Integrated Scripting Environment (ISE)


  • Check for updates after new features

    • Install available updates


  • Enable Remote Desktop

    • System Properties -> Remote

      • Windows 2003 AD

        • Select "Allow connection sfrom computers running any version of Remote Desktop"


      • Windows 2008 AD (optional)

        • Select "Allow connections only from computers runnign Remote Desktop with Network Level Authentication"


  • Windows Firewall

    • Turn Windows Firewall on of off

      • Home or work location settings

        • Turn off Windows Firewall


      • Public network location settings

        • Turn off Windows Firewall


  • Complete Initial Configuration Tasks

    • Check "Do not show this window at logon" and close


Modify and Silence Server Manager


(Optional) Parts of this step may violate your local security policies, however, it's more than likely that a GPO will ultimately override this configuration. We find it useful to have this disabled for "general purpose" templates - especially in a testing/lab environment where the security measures will be defeated as a matter of practice.

  • Security Information -> Configure IE ESC

    • Select Administrators Off

    • Select Users Off


  • Select "Do not show me this console at logon" and close


Modify Taskbar Properties


Making the taskbar usable for your organization is another matter of taste. We like smaller icons and maximizing desktop utility. We also hate being nagged by the notification area...

  • Right-click Taskbar -> Taskbar and Start Menu Properties ->

    • Taskbar -> Check "Use small icons"

    • Taskbar -> Customize... ->

      • Set all icons to "Only show notifications"

      • Click "Turn system icons on or off"

        • Turn off "Volume"


    • Start Menu -> Customize...

      • Uncheck "Use large icons"


Modify default settings in Control Panel


Some Control Panel changes will help "optimize" the performance of the VM by disabling unnecessary features like screen saver and power management. We like to see our corporate logo on server desktops (regardless of performance implications) so now's the time to make that change as well.

  • Control Panel -> Power Options -> High Performance

    • Change plan settings -> Turn off the display -> Never


  • Control Panel -> Sound ->

    • Pop-up: "Would you like to enable the Windows Audio Service?" - No

    • Sound -> Sounds -> Sound Scheme: No Sounds

    • Uncheck "Play Windows Startup sound"


  • Control Panel -> VMware Tools -> Uncheck "Show VMware Tools in the taskbar"

  • Control Panel -> Display -> Change screen saver -> Screen Saver -> Blank, Wait 10 minutes

  • Change default desktop image (optional)

    • Copy your desktop logo background to a public folder (i.e. "c:\Users\Public\Public Pictures")

    • Control Panel -> Display -> Change desktop background -> Browse...

    • Find picture in browser, Picture position stretch


Disable Swap File


Disabling swap will allow the defragment step to be more efficient and will disable VMware's advanced memory management functions. This is only temporary and we'll be enabling swap right before committing the VM to template.

  • Computer Properties -> Visual Effects -> Adjust for best performance

  • Computer Properties -> Advanced System Settings ->

    • System Properties -> Advanced -> Performance -> Settings... ->

    • Performance Options -> Advanced -> Change...

      • Uncheck "Automatically manage paging file size for all drives"

      • Select "No paging file"

      • Click "Set" to disable swap file


Remove hibernation file and set boot timeout


It has been pointed out that the hibernation and timeout settings will get re-enabled by the sysprep operation. Removing the hibernation files will help in defragment now. We'll reinforce these steps in the customization wizard later.

  • cmd: powercfg -h off

  • cmd: bcdedit /timeout 5


Disable indexing on C:


Indexing the OS disk can suck performance and increase disk I/O unnecessarily. Chances are, this template (when cloned) will be heavily cached on your disk array so indexing in the OS will not likely benefit the template. We prefer to disable this feature as a matter of practice.

  • C: -> Properties -> General ->

    • Uncheck "Allow files on this drive to have contents indexed in addition to file properties"

    • Apply -> Apply changes to C:\ only (or files and folders, to taste)


Housekeeping


Time to clean-up and prepare for a streamlined template. The first step is intended to aid the copying of "administrator defaults" to "user defaults." If this does not apply, just defragment.

Remove "Default" user settings:

  • C:\Users -> Folder Options -> View -> Show hidden files...

  • C:\Users\Default -> Delete "NTUser.*" Delete "Music, Pictures, Saved Games, Videos"


Defragment

  • C: -> Properties -> Tools -> Defragment Now...

    • Select "(C:)"

    • Click "Defragment disk"


Copy Administrator settings to "Default" user


The "formal" way of handling this step requires a third-party utility. We're giving credit to Jason Samuel for consolidating other bloggers methods because he was the first to point out the importance of the "unattend.xml" file and it really saved us some time. His blog post also includes a link to an example "unattend.xml" file that can be modified for your specific use, as we have.

  • Jason Samuel points out a way to "easily" copy Administrator settings to defaults, by activating the CopyProfile node in an "unattend.xml" file used by sysprep.

  • Copy your "unattend.xml" file to C:\windows\system32\sysprep

  • Edit unattend.xml for environment and R2 version

    • Update offline image pointer to correspond to your virtual CD

      • E.g. wim:d:... -> wim:f:...


    • Update OS offline image source pointer, valid sources are:

      • Windows Server 2008 R2 SERVERDATACENTER

      • Windows Server 2008 R2 SERVERDATACENTERCORE

      • Windows Server 2008 R2 SERVERENTERPRISE

      • Windows Server 2008 R2 SERVERENTERPRISECORE

      • Windows Server 2008 R2 SERVERSTANDARD

      • Windows Server 2008 R2 SERVERSTANDARDCORE

      • Windows Server 2008 R2 SERVERWEB

      • Windows Server 2008 R2 SERVERWEBCORE

      • Windows Server 2008 R2 SERVERWINFOUNDATION


    • Any additional changes necessary


  • NOTE: now would be a good time to snapshot/backup the VM

  • cmd: cd \windows\system32\sysprep

  • cmd: sysprep /generalize /oobe /reboot /unattend:unattend.xml

    • Check "Generalize"

    • Shutdown Options -> Reboot


  • Login

  • Skip Activation

  • Administrator defaults are now system defaults


  • Reset Template Name

    • Computer Properties -> Advanced System Settings -> Computer name -> Change...

      • Enterprise Edition: W2K8R2ENT-TMPL

      • Standard Edition: W2K8R2STD-TMPL

      • Foundation Edition: W2K8R2FND-TMPL


    • If this will be an AD member clone, join template to the domain now


    • Restart


  • Enable Swap files

    • Computer Properties -> Advanced System Settings ->

      • System Properties -> Advanced -> Performance -> Settings... ->

      • Performance Options -> Advanced -> Change...

        • Check "Automatically manage paging file size for all drives"


  • Release IP

    • cmd: ipconfig /release


  • Shutdown

  • Convert VM to template


Convert VM Template to Clone


Use the VMware Customization Wizard to create a re-usable script for cloning the template. Now's a good time to test that your template will create a usable clone. If it fails, go check the "red letter" items and make sure your setup is correct. The following hints will help improve your results.

  • Remove hibernation related files and reset boot delay to 5 seconds in Customization Wizard


  • Remember that the ISO is still mounted by default. Once VM's are deployed from the template, it should be removed after the customization process is complete and additional roles/features are added.


That's the process we have working at SOLORI. It's not rocket science, but if you miss an important step you're likely to be visited by an error in "pass [specialize]" that will have you starting over. Note: this also happens when your AD credentials are bad, your license key is incorrect (version/edition mismatch, typo, etc.) or other nondescript issues - too bad the error code is unhelpful...

Wednesday, August 11, 2010

VMware Management Assistant Panics on Magny Cours

VMware's current version of its vSphere Management Assistant - also known as vMA (pronounced "vee mah") - will crash when run on an ESX host using AMD Magny Cours processors. This behavior was discovered recently when installing the vMA on an AMD Opteron 6100 system (aka. Magny Cours) causing a "kernel panic" on boot after deploying the OVF template. Something of note is the crash also results in 100% vCPU utilization until the VM is either powered-off or reset:

[caption id="attachment_1624" align="aligncenter" width="436" caption="vMA Kernel Panic on Import"]vMA Kernel Panic on Import[/caption]

As it turns out, no manner of tweaks to the virtual machine's virtualization settings nor OS boot/grub settings (i.e. noapic, etc.) seem to cure the ills for vMA. However, we did discover that the OVF deployed appliance was configured as a VMware Virtual Machine Hardware Version 4 machine:

[caption id="attachment_1625" align="aligncenter" width="450" caption="vMA 4.1 defaults to Virtual Machine Hardware Version 4"]vMA 4.1 defaults to Hardware Version 4[/caption]

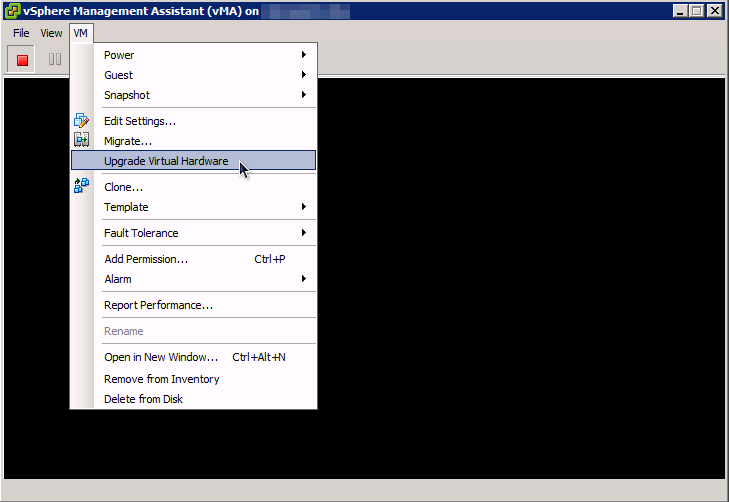
Since our lab vMA deployments have all been upgraded to Virtual Machine Harware Version 7 for some time (and for functional benefits as well), we tried to update the vMA to Version 7 and try again:

[caption id="attachment_1626" align="aligncenter" width="450" caption="Upgrade vMA Virtual Machine Version..."]Upgrade vMA Virtual Machine Version...[/caption]

This time, with Virtual Hardware Version 7 (and no other changes to the VM), the vMA boots as it should:

[caption id="attachment_1627" align="aligncenter" width="450" caption="vMA Booting after Upgrade to Virtual Hardware Version 7"]vMA Booting after Upgrade to Virtual Hardware Version 7[/caption]

Since the Magny Cours CPU is essentially a pair of tweaked 6-core Opteron CPUs in a single package, we took the vMA into the lab and deployed it to an ESX server running on AMD 2435 6-core CPUs: the vMA booted as expected, even with Virtual Hardware Version 4. A quick check of the community and support boards show a few issues with older RedHat/Centos kernels (like vMA's) but no reports of kernel panic with Magny Cours. Perhaps there are just not that many AMD Opteron 6100 deployments out there with vMA yet...

Sunday, July 18, 2010

Quick-Take: NexentaStor AD Shares in 100% Virtual SMB

Here's a maintenance note for SMB environments attempting 100% virtualization and relying on SAN-based file shares to simplify backup and storage management: beware the chicken-and-egg scenario on restart before going home to capture much needed Zzz's. If your domain controller is virtualized and it's VMDK file lives on SAN/NAS, you'll need to restart SMB services on the NexentaStor appliance before leaving the building.

Here's the scenario:

  1. An afterhours SAN upgrade in non-HA environment (maybe Auto-CDP for BC/DR, but no active fail-over);

  2. Shutdown of SAN requires shutdown of all dependent VM's, including domain controllers (AD);

  3. End-user and/or maintenance plans are dependent on CIFS shares from SAN;

  4. Authentication of CIFS shares on NexentaStor is AD-based;


Here's the typical maintenance plan (detail omitted):

  1. Ordered shutdown of non-critical VM's (including UpdateManager, vMA, etc.);

  2. Ordered shutdown of application VM's;

  3. Ordered shutdown of resource VM's;

  4. Ordered shutdown of AD server VM's (minus one, see step 7);

  5. Migrate/vMotion remaining AD server and vCenter to a single ESX host;

  6. Ordered shutdown of ESX hosts (minus one, see step 8);

  7. vSphere Client: Log-out of vCenter;

  8. vSphere Client: Log-in to remaining ESX host;

  9. Ordered shutdown of vCenter;

  10. Ordered shutdown of remaining AD server;

  11. Ordered shutdown of remaining ESX host;

  12. Update SAN;

  13. Reboot SAN to update checkpoint;

  14. Test SAN update - restoring previous checkpoint if necessary;

  15. Power-on ESX host containing vCenter and AD server (see step 8);

  16. vSphere Client: Log-in to remaining ESX host;

  17. Power-on AD server (through to VMware Tools OK);

  18. Restart SMB service on NexentaStor;

  19. Power-on vCenter;

  20. vSphere Client: Log-in to vCenter;

  21. vSphere Client: Log-out of ESX host;

  22. Power-on remaining ESX hosts;

  23. Ordered power-on of remaining VM's;


A couple of things to note in an AD environment:

  1. NexnetaStor requires the use of AD-based DNS for AD integration;

  2. AD-based DNS will not be available at SAN re-boot if all DNS servers are virtual and only one SAN is involved;

  3. Lack of DNS resolution on re-boot will cause a failure for DNS name based NTP service synchronization;

  4. NexentaStor SMB service will fail to properly initialize AD credentials;

  5. VMware 4.1 now pushes AD authentication all the way to ESX hosts, enabling better credential management and security but creating a potential AD dependency as well;

  6. Using auto-startup order on the remaining ESX host for AD and vCenter could automate the process (steps 17 & 19), however, I prefer the "manual" approach after a SAN upgrade in case the upgrade failure is detected only after ESX host is restarted (i.e. storage service interaction in NFS/iSCSI after upgrade).


SOLORI's Take: This is a great opportunity to re-think storage resources in the SMB as the linchpin to 100% virtualization.  Since most SMB's will have a tier-2 or backup NAS/SAN (auto-sync or auto-CDP) for off-rack backup, leveraging a shared LUN/volume from that SAN/NAS for a backup domain controller is a smart move. Since tier-2 SAN's may not have the IOPs to run ALL mission critical applications during the maintenance interval, the presence of at least one valid AD server will promote a quicker RTO, post-maintenance, than coming up cold. [This even works with DAS on the ESX host]. Solution - add the following and you can ignore step 15:

3a. Migrate always-on AD server to LUN/volume on tier-2 SAN/NAS;


24. Migrate always-on AD server from LUN/volume on tier-2 SAN/NAS back to tier-1;


Since even vSphere Essentials Plus has vMotion now (a much requested and timely addition) collapsing all remaining VM's to a single ESX host is a no brainer. However, migrating the storage is another issue which cannot be resolved without either a shutdown of the VM (off-line storage migration) or Enterprise/Enterprise Plus version of vSphere. That is why the migration of the AD server from tier-2 is reserved for last (step 17) - it will likely need to be shutdown to migrate the storage between SAN/NAS appliances.

Friday, July 16, 2010

Quick-Take: vSphere 4, Now with SUSE Enterprise Linux, Gratis

Earlier this month VMware announced that it was expanding its partnership with Novell in order to offer a 1:1 CPU enablement license for SLES. Mike Norman's post at VirtualizationPractice.com discusses the potential "darker side" of the deal, which VMware presents this way:
VMware and Novell are expanding their technology partnership to make it easier for customers to use SLES operating system in vSphere environments with support offerings that will help your organization:

  • Reduce the cost of maintaining SLES in vSphere environments

  • Obtain direct technical support from VMware for both vSphere and SLES

  • Simplify your purchasing and deployment experience


In addition, VMware plans to standardize our virtual appliance-based products on SLES for VMware further simplifying the deployment and ongoing management of these solutions.

  • Customers will receive SLES with one (1) entitlement for a subscription to patches and updates per qualified VMware vSphere SKU. For example, if a customer were to buy 100 licenses of a qualified vSphere Enterprise Plus SKU, that customer would receive SLES with one hundred (100) entitlements for subscription to patches and updates.

  • Customers cannot install SLES with the accompanying patches and updates subscription entitled by a VMware purchase 1) directly on physical servers or 2) in virtual machines running on third party hypervisors.

  • Technical support for SLES with the accompanying patches and updates subscription entitled by a VMware purchase is not included and may be purchased separately from VMware starting in 3Q 2010.


- VMware Website, 6/2010


The part about standardization has been emphasized by us - not VMware - but it seems to be a good fit with VMware's recent acquisition of Zimbra (formerly owned by Yahoo!) and the release of vSphere 4.1 with "cloud scale" implications. That said, the latest version of the VMware Data Recovery appliance has been recast from RedHat to CentOS with AD integration, signaling that it will take some time for VMware to transition to Novell's SUSE Linux.


SOLORI's Take: Linux-based virtual appliances are a great way to extend features and control without increasing license costs. Kudus to VMware for hopping on-board the F/OSS train. Now where's my Linux-based vCenter with a Novell Directory Services for Windows alternative to Microsoft servers?

Thursday, June 17, 2010

VMware vSphere Update 2, View 4.x Issues

Right on the heels of vSphere 4 Update 2, a flurry of twitter and blog postings suggestion caution if upgrading a VMware View 4.x environment. Now, VMware has updated its KB to include a workaround for those needing to move to Update 2 for the feature and hardware support benefits but can't afford to break their PCoIP-based View environment: in short, it's all VMware Tools fault! Seems the SVGA drive in VMware Tools for Update 2 has a problem with PCoIP - preventing desktops from connecting.

Now that makes some sense given the fact that VMware is quite adamant about the ORDER in which VMware Tools, .NET framework and the View Agent must be installed. The current options for PCoIPers out there needing Update 2 are three-fold:

  1. Don't upgrade VMware Tools;

  2. Upgrade VMware Tools with "Advanced Options" including

    1. For x86 guests:
      /s /v "/qn REINSTALLMODE=voums REINSTALL=WYSE,VMXNet,
      VMCI,Mouse,MemCtl,Hgfs,VSS,VMXNet3,vmdesched,ThinPrint,Sync,
      PVSCSI,Debug,BootCamp,Audio,Buslogic,VICFSDK,VAssertSDK,
      Toolbox,Upgrader,GuestSDK,PerfMon,Common,microsoft_dlls_x86,
      ArchSpecific"
      (line breaks included for formatting only)

    2. For x64 guests:
      /s /v "/qn REINSTALLMODE=voums REINSTALL=WYSE,VMXNet,
      VMCI,Mouse,MemCtl,Hgfs,VSS,VMXNet3,vmdesched,ThinPrint,Sync,
      PVSCSI,Debug,BootCamp,Audio,Buslogic,VICFSDK,VAssertSDK,Toolbox,
      Upgrader,GuestSDK,PerfMon,Common,microsoft_dlls_x64,ArchSpecific"
      (line breaks included for formatting only)


  3. Use RDP (not really an option for PCoIP environments)


If you're already STUNG by the VMware Tools, the KB has a procedure for back-tracking the SVGA driver after VMware Tools for Update 2 has been installed. Here it is:
For customers that are experiencing the issue and want to continue using PCoIP, use this workaround:

Note: VMware recommends that you have VMware View 4.0.1 installed prior to performing these steps.

  1. Log in to the affected virtual machine(s) with Administrator rights. This is any virtual machine that has the VMware Tools shipped with ESX 4.0 Update 2 installed.

  2. Rename the C:\Program File\Common Files\VMware\Drivers\Video folder to C:\Program File\Common Files\VMware\Drivers\Video-OLD.

  3. From a working virtual machine, copy the C:\Program File\Common Files\Vmware\Drivers\Video folder to C:\Program File\Common Files\Vmware\Drivers\ on an affected virtual machine.

  4. Click Start > Settings > Control Panel > System.

  5. Click the Hardware tab and click Device Manager.

  6. Expand Display Adapters.

  7. Choose VMWARE SVGA II. Right-click on it and choose Properties.

  8. Click the Driver tab. You are presented with the SVGA driver properties.

    The version is 11.6.0.34 (Driver Date 01/03/2010).

  9. Click Update Driver. The Hardware Update wizard displays.

  10. When prompted with the question, "Can windows connect to Windows Update to search for software?", click No, not at this time and click Next.

  11. When prompted with the question, "What do you want the wizard to do", click Install from a list or specific location (Advanced) and click Next.

  12. Click Don't search. I will choose the driver to install and click Next.

  13. On the next screen, you are presented a list of two or more VMWARE SVGA II Versions to choose from. For example:

    VMWARE SVGA II Version: 11.6.0.31 (21/09/2009)
    VMWARE SVGA II Version: 11.6.0.32 (24/09/2009)
    VMWARE SVGA II Version: 11.6.0.34 (01/03/2010)

    Choose VMWARE SVGA II Version: 11.6.0.32 (24/09/2009).

  14. Click Next. The driver begins installing.

  15. Click Continue Anyway when Windows notifies you that VMware SVGA II has not passed Windows logo testing.

    The driver install completes.

  16. Click Finish.

  17. Click YES when prompted to restart your computer.

  18. Verify that PCoIP is now working.


Note: VMware is investigating a permanent fix for the issue so our customers can upgrade to ESX 4.0 Update 2 without experiencing this issue.

- VMware KB1022830, 6/17/2010


In-the-Lab: Install VMware Tools on NexentaStor VSA

Physical lab resources can be a challenge to "free-up" just to test a potential storage appliance. With NexentaStor, you can download a pre-configured VMware (or Xen) appliance from NexentaStor.Org, but what if you want to build your own? Here's a little help on the subject:

  1. Download the ISO from NexentaStor.Org (see link above);

  2. Create a VMware virtual machine:

    1. 2 vCPU

    2. 4GB RAM (leaves about 3GB for ARC);

    3. CD-ROM (mapped to the ISO image);

    4. One (optionally two if you want to simulate the OS mirror) 4GB, thin provisioned SCSI disks (LSI Logic Parallel);

    5. Guest Operating System type: Sun Solaris 10 (64-bit)

    6. One E1000 for Management/NAS

    7. (optional) One E1000 for iSCSI


  3. Streamline the guest by disabling unnecessary components:

    1. floppy disk

    2. floppy controller (remove from BIOS)

    3. primary IDE controller (remove from BIOS)

    4. COM ports (remove from BIOS)

    5. Parallel ports (remove from BIOS)


  4. Boot to ISO and install NexentaStor CE

    1. (optionally) choose second disk as OS mirror during install


  5. Register your installation with Nexenta

    1. http://www.nexenta.com/register-eval

    2. (optional) Select "Solori" as the partner


  6. Complete initial WebGUI configuration wizard

    1. If you will join it to a domain, use the domain FQDN (i.e. microsoft.msft)

    2. If you choose "Optimize I/O performance..." remember to re-enable ZFS intent logging under Settings>Preferences>System

      1. Sys_zil_disable = No


  7. Shutdown the VSA

    1. Settings>Appliance>PowerOff


  8. Re-direcect the CD-ROM

    1. Connect to Client Device


  9. Power-on the VSA and install VMware Tools

    1. login as admin

      1. assume root shell with "su" and root password


    2. From vSphere Client, initiate the VMware Tools install

    3. cd /tmp

      1. untar VMware Tools with "tar zxvf  /media/VMware\ Tools/vmware-solaris-tools.tar.gz"


    4. cd to /tmp/vmware-tools-distrib

      1. install VMware Tools with "./vmware-install.pl"

      2. Answer with defaults during install


    5. Check that VMware Tools shows and OK status

      1. IP address(es) of interfaces should now be registered

        [caption id="attachment_1580" align="aligncenter" width="300" caption="VMware Tools are registered."][/caption]


  10. Perform a test "Shutdown" of your VSA

    1. From the vSphere Client, issue VM>Power>Shutdown Guest

      [caption id="attachment_1581" align="aligncenter" width="300" caption="System shutting down from VMware Tools request. "][/caption]

    2. Restart the VSA...

      [caption id="attachment_1582" align="aligncenter" width="300" caption="VSA restarting in vSphere "][/caption]


Now VMware Tools has been installed and you're ready to add more virtual disks and build ZFS storage pools. If you get a warning about HGFS not loading properly at boot time:

[caption id="attachment_1586" align="aligncenter" width="300" caption="HGFS module mismatch warning."][/caption]

it is not usually a big deal, but the VMware Host-Guest File System (HGFS) has been known to cause issues in some installations. SInce the NexentaStor appliance is not a general purpose operating system, you should customize the install to not use HGFS at all. To disable it, perform the following:

  1. Edit "/kernel/drv/vmhgfs.conf"

    1. Change:     name="vmhgfs" parent="pseudo" instance=0;

    2. To:     #name="vmhgfs" parent="pseudo" instance=0;


  2. Re-boot the VSA


Upon reboot, there will be no complaint about the offending HGFS module. Remember that, after updating VMware Tools at a future date, the HGFS configuration file will need to be adjusted again. By the way, this process works just as well on the NexentaStor Commercial edition, however you might want to check with technical support prior to making such changes to a licensed/supported deployment.

Friday, June 11, 2010

vSphere 4 Update 2 Released

VMware vSphere 4, Update 2 has been released with the following changes to ESXi:
The following information provides highlights of some of the enhancements available in this release of VMware ESXi:

  • Enablement of Fault Tolerance Functionality for Intel Xeon 56xx Series processors— vSphere 4.0 Update 1 supports the Intel Xeon 56xx Series processors without Fault Tolerance. vSphere 4.0 Update 2 enables Fault Tolerance functionality for the Intel Xeon 56xx Series processors.

  • Enablement of Fault Tolerance Functionality for Intel i3/i5 Clarkdale Series and Intel Xeon 34xx Clarkdale Series processors— vSphere 4.0 Update 1 supports the Intel i3/i5 Clarkdale Series and Intel Xeon 34xx Clarkdale Series processors without Fault Tolerance. vSphere 4.0 Update 2 enables Fault Tolerance functionality for the Intel i3/i5 Clarkdale Series and Intel Xeon 34xx Clarkdale Series processors.

  • Enablement of IOMMU Functionality for AMD Opteron 61xx and 41xx Series processors— vSphere 4.0 Update 1 supports the AMD Opteron 61xx and 41xx Series processors without input/output memory management unit (IOMMU). vSphere 4.0 Update 2 enables IOMMU functionality for the AMD Opteron 61xx and 41xx Series processors.

  • Enhancement of the resxtop utility— vSphere 4.0 U2 includes an enhancement of the performance monitoring utility, resxtop. The resxtop utility now provides visibility into the performance of NFS datastores in that it displays the following statistics for NFS datastores: Reads/s, writes/s, MBreads/s, MBwrtn/s, cmds/s, GAVG/s (guest latency).

  • Additional Guest Operating System Support— ESX/ESXi 4.0 Update 2 adds support for Ubuntu 10.04. For a complete list of supported guest operating systems with this release, see the VMware Compatibility Guide.


Resolved Issues – In addition, this release delivers a number of bug fixes that have been documented in theResolved Issues section.

ESXi 4 Update 2 Release Notes


Noted in the release is the official support for AMD's IOMMU in Opteron 6100 and 4100 processors - available in 1P, 2P and 4P configurations. This finally closes the (functional) gap between AMD Opteron and Intel's Nehalem line-up. Likewise, FT support for many new Intel processors has been added. Also, the addition of NFS performance counters in ESXTop will make storage troubleshooting a bit easier. Grab you applicable update at VMware's download site now (SnS required.)

Microsoft Update Kills vSphere Client

Got a problem running vSphere Client today? Seeing the following pop-up when trying to access your VMware stack?

Error parsing the server...Login doesn't really continue, but in fact, ends with the following error:

The type initializer for...


Your environment has not been hacked! It's a problem with your most recent Windows Update, introducing a .NET exception that your "old" version of VMware vSphere Client can't handle. While you can uninstall the offending patch(es) to resolve the problem, the best remedy is to login to VMware's site and download the latest vSphere Client (VMware KB 1022611).

By the way, if you're vSphere Client is old enough to be affected (prior to Update 1), you might need to scan your vSphere environment for updates too. If you have SnS, run over to VMware's download page for vSphere and get the updated packages, starting with the vSphere Client: you can find the installable Client package with the vCenter Server Update 2 downloads.

Thursday, June 3, 2010

ESXi Patches fix VSS, NTP and VMkernel

Two patches were made available on May 27, 2010 for ESXi 4.0 to fix certain bugs and security vulnerabilities in the platform. These patches are identified as ESXi400-201005401-SG and ESXi400-201005402-BG.

The first patch is security related and requires a reboot of the ESXi host:
This patch fixes a security issue. The updated NTP daemon fixes a flaw in the way it handled certain malformed NTP packets. The NTP daemon logged information about all such packets and replied with a NTP packet that was treated as malformed when received by another ntpd. A remote attacker could use this flaw to create an NTP packet reply loop between two ntpd servers through a malformed packet with a spoofed source IP address and port, causing ntpd on those servers to use excessive amounts of CPU time and fill disk space with log messages. The Common Vulnerabilities and Exposures Project (cve.mitre.org) has assigned the name CVE-2009-3563 to this issue.

ESXi 4.0 hosts might stop responding when interrupts are shared between VMkernel and service console. You might also observe the following additional symptoms:

  • Network pings to the ESXi hosts might fail.

  • Baseboard management controllers (BMC) such as HP Integrated Lights-Out (iLO) console might appear to be in a non-responsive state.


- VMware KB Article, 1021041


An interesting note is the reference to the service console in ESXi, however the sharing of interrupts between ESX drivers and the service console has long been a problem in ESX (not ESXi since there is no service console)... The second patch does not require a reboot, although it includes an update to VMware Tools which could impact uptime on affected virtual machines (Windows Server 2008 R2 and Windows 7). The KB article says this about the patch:


The VMware Snapshot Provider service is not listed in the Services panel. The quiesced snapshots do not use VMware Tools VSS components in Windows Server 2008 R2 or Windows 7 operating systems. This issue is seen when the user or backup software performs a quiesced snapshot on virtual machines on ESXi 4.0 hosts. This patch fixes the issue.


- VMware KB Article, 1021042


Since VSS quiescence is at issue here, DR snapshots and backups relying on VMware Data Recovery may be unreliable without the new VMware Tools installed. If your systems rely on VMware Data Recovery APIs for backup, this patch should be considered mandatory.

Wednesday, April 7, 2010

Quick Take: IBM Tops VMmark, Crushes Record with 4P Nehalem-EX

It was merely a matter of time before one of the new core-rich titans - the Intel's 8-core "Beckton" Nehalem-EX (Xeon 7500) or AMD's 12-core "Magny-Cours" (Opteron 6100) - was to make a name for itself on VMware's VMmark benchmark. Today, Intel draws first blood in the form of an 4-processor, 32-core, 64-thread, monster from IBM: the x3850 X5 running four Xeon X7560 (2.266GHz - 2.67GHz w/turbo, 130W TDP, each) and 384GB of DDR3-1066 low-power registered DIMMs. Weighing-in at 70.78@48 tiles, the 4P IBM System x3850 handily beats the next highest system - the 48-core DL785 G5 which set the record of 53.73@35 tiles back in August, 2009 - and bests it by over 30%.

At $3,800+ per socket for the tested Beckton chip, this is no real 2P alternative. In fact, a pair of Cisco UCS B250 M2 blades will get 52 tiles running for much less money. Looking at processor and memory configurations alone, this is a $67K+ enterprise server, resulting in a moderately-high $232/VM price point for the IBM x3850 X5.

SOLORI's Take: The most interesting aspect of the EX benchmark is its clock-adjusted scaling factor: between 70% and 91% versus a 2P/8-core Nehalem-EP reference (Cisco UCS, B200 M1, 25.06@17 tiles). The unpredictable nature of Intel's "turbo" feature - varying with thermal loads and per-core conditions - makes an exact clock-for-clock comparison difficult. However, if the scaling factor is 90%, the EX blows away our previous expectations about the platform's scalability. Where did we go wrong when we predicted a conservative 44@39 tiles? We're looking at three things: (1) a bad assumption about the effectiveness of "turbo" in the EP VMmark case (setting Ref_EP_Clock to 3.33 GHz), and (2) underestimating EX's scaling efficiency (assumed 70%), (3) assuming a 2.26GHz clock for EX.

Chosing our minimum QPI/HT3 scalability factor of 75%, the predicted performance was derived this way from HP Proliant BL490 G6 as a baseline:

Est. Tiles = EP_Tiles_per_core( 2.13 ) * 32 cores * Scaling_Efficiency( 75% ) * EX_Clock( 2.26 ) / EP_Clock( 2.93 ) = 39 tiles


Est. Score = Est_Tiles( 40 ) * EP_Score_per_Tile( 1.43 ) * Est_EX_Clock( 2.26 ) / Ref_EP_Clock( 2.93 ) = 44.12


Est. Nehalem-EX VMmark -> 44.12@39 tiles


Correcting for the as-tested clock/turbo numbers, and using AMD's 2P-to-4P VMmark scaling efficiency of 83%, and shifting to the new UCS baseline (with newer ESX version) the Nehalem-EX prediction factors to:

Est. Tiles = EP_Tiles_per_core( 2.13 ) * 32 cores * Scaling_Efficiency( 83% ) * EX_Clock( 2.67 ) / EP_Clock( 2.93 ) = 51 tiles


Est. Score = Est_Tiles( 51 ) * EP_Score_per_Tile( 1.47 ) * Est_EX_Clock( 2.67 ) / Ref_EP_Clock( 2.93 ) = 68.32


Est. Nehalem-EX VMmark -> 68.3@51 tiles


Clearly, this approach either overestimates the scaling efficiency or underestimates the "turbo" mode. IBM claims that a 2.93 GHz "turbo" setting is viable where Intel suggests 2.67 GHz is the maximum, so there is a source of potential bias. Looking at the tiles-per-core ratio of the VMmark result, the Nehalem-EX drops from 2.13 tiles per core on EP/2P platforms to 1.5 tiles per core on EX/4P platforms - about a 30% drop in per-core loading efficiency. That indicator matches well with our initial 75% scaling efficiency moving from 2P to 4P - something that AMD demonstrated with Istanbul last August. Given the high TDP of EX and IBM's 2.93 GHz "turbo" specification, it's possible that "turbo" is adding clock cycles (and power consumption) and compensating for a "lower" scaling efficiency than we've assumed. Looking at the same estimation with 2.93GHz "clock" and 71% efficiency (1.5/2.13), the numbers fall in line with VMmark:

Est. Tiles = EP_Tiles_per_core( 2.13 ) * 32 cores * Scaling_Efficiency( 71% ) * EX_Clock( 2.93 ) / EP_Clock( 2.93 ) = 48 tiles


Est. Score = Est_Tiles( 48 ) * EP_Score_per_Tile( 1.47 ) * Est_EX_Clock( 2.93 ) / Ref_EP_Clock( 2.93 ) = 70.56


Est. Nehalem-EX VMmark -> 70.56@48 tiles


This give us a good basis for evaluating 2P vs. 4P Nehalem systems: scaling factor of 71% and capable of pushing clock towards the 3GHz mark within its thermal envelope. Both of these conclusions fit typical 2P-to-4P norms and Intel's process history.

SOLORI's 2nd Take: So where does that leave AMD's newest 12-core chip? To date, no VMmark exists for AMD's Magny-Cours, and AMD chips tend not to do as well in VMmark as their Intel peers do to the benchmarks SMT-friendly loads. However, we can't resist using the same analysis against AMD/MC's 2.4GHz Opteron 6174SE (theoretical) using the 2P HP DL385 G6 as a baseline for core loading and the HP DL785 G6 for tile performance (best of the best cases):

Est. Tiles = HP_Tiles_per_core( 0.92 ) * 48 cores * Scaling_Efficiency( 83% ) * MC_Clock( 2.3 ) / HP_Clock( 2.6 ) = 33 tiles


Est. Score = Est_Tiles( 34 ) * HP_Score_per_Tile( 1.54 ) * Est_MC_Clock( 2.3 ) / Ref_HP_Clock( 2.8 ) = 41.8


Est. 4P Magny-Cours VMmark -> 41.8@33 tiles


That's nowhere near good enough to top the current 8P, 48-core Istanbul VMmark at 53.73@35 tiles, so we'll likely have to wait for faster 6100 parts to see any new AMD records. However, assuming AMD's proposition is still "value 4P" so about 200 VM's at under $18K/server gets you around $90/VM or less.

Tuesday, February 9, 2010

Quick Take - VMware PartnerExchange 2010: Day 3

With about 2.5 hours of sleep and the VCP410 test looming, Tuesday took on a different tone than the previous two days. My calendar was full:

  • 5:30 - Wake-up and check e-mail/blog/systems back in CST

  • 7:00am - Breakfast at the VMware Experience Hall

  • 8:30am - Keynote with Carl Eschenbach, EVP Worldwide Sales & Field Ops, VMware

  • 10:00am - ESXi Convergence Roadmap Session

  • 11:15am - View4 Workload Sizing and Testing

  • 12:15pm - Lunch in the VMware Alumni Lounge

  • 1:30pm - vSphere4 Advanced Configuration Topics

  • 3:45pm - VCP410 Test

  • 5:15pm - View Composer Tips, Tricks and Best Practices

  • 6:45pm - Check-in at home

  • 7:00pm - Update blog and check/respond to e-mail


First, the keynote with Carl and the gang was awesome! VMware took a really aggressive attitude towards the competition, including Citrix (virtual desktop) and Microsoft (virtual data center). To sum up the conversation: VMware's intent on carrying on the Q4/09 momentum through 2011, extending its lead in virtual data center and cloud computing capabilities. But Carl's not happy with just the traditional server market, and VMware wants to own the virtual desktop space - virtually putting the squeeze on Citrix as the walls close-in around them.

With over 60-70% of net new Citrix VDI builds being deployed on VMware's ESX servers, it make me wonder why Citrix would drive its XenApp customers to VDI - in the form of XenDesktop4 - by offering a 2-for-1 trade-in program. Isn't this like asking their own clients to reconsider the value proposition of XenApp - in essence turning vendor-locked accounts into a new battleground with VMware? If the momentum shifts towards VMware View4.x and VMware accelerates the pace on product features (including management and integration) as suggested by Carl's aggressive tone today, where does that leave XenDesktop and Citrix?

[caption id="attachment_1439" align="alignright" width="150" caption="The VMware Express Mobile Data Center"]The VMware Express Trailer[/caption]

The VMware Express: Coming to a City Near You!


VMware introduced its "data center on wheels" to the PartnerExchange 2010 audience today and I got a chance to get on-board and take a look. The build-out was clean and functional with 60+ Gbps of external interconnects waiting for a venue. Inside the Express was a data center, a conference room and several demonstration stations showing VMware vSphere and View4 demos.

[caption id="attachment_1438" align="alignleft" width="113" caption="6 ton Mobile A/C for Express' Data Center"]6 ton Mobile A/C for Express' Data Center[/caption]

VMware rolled-out the red carpet to the PartnerExchange 2010 attendees. To the right - above the 5-th wheel - is the conference room. All the way in the back (to the left) is the data center portion. In-between the data center and the conference room lies the demonstration area with external plasma screens in kick-panels displaying slide deck and demonstration materials.

[caption id="attachment_1444" align="alignright" width="92" caption="The Express' Diesel Generator - Capable of Powering Things for Nearly 2-days"]The Express' Diesel Generator - Capable of Powering Things for Nearly 2-days[/caption]

Up front - behind the cab - rests 6-tons of air conditioning mounted to the front of the trailer. This keeps the living area inside habitable and the data center (about 70-80 sq. ft.) cool enough to run some serious virtualization equipment. Mounted directly behind the driver's cabin is the diesel generator - capable of powering the entire operation for better than 40-hours when external power is unavailable. Today, however, the VMware Express was taking advantage of "house power" provided by Mandalay Bay's conference center.

Where the rubber met the road was inside the data center: currently occupied by an EMC/Cisco rack and a rack powered by MDS/NetApp/Xsigo. Both featured 12TB of raw storage and high-density Nehalem-EP solutions. In the right corner, the heavyweight EMC/Cisco bundle was powered by Cisco's UCS B-series platform featuring eight Nehalem 2P blades per 6U chassis fed by a pair of Cisco 4900-series converged switches. In the left corner, the super middleweight MDS Micro QUADv-series"mini-blade" chassis featuring an eight Nehalem 2P blades per two 2U chassis fed by a pair of Xsigo I/O directors delivering converged network and SAN tunneled over infiniband interconnects.

[caption id="attachment_1441" align="alignleft" width="300" caption="Two-of-Three Racks are Currently Occupied by EMC/Cisco and MDS/NetApp/Xsigo"]Still More Capacity for Additional Hardware Sponsors[/caption]

It will be interesting to see how the drive arrays survive the journey as the VMware Express travels across the country over the next year. Meanwhile, this tractor trailer is packing 60-blades worth of serious virtualization hardware destined for a town near you. VMware is currently looking for additional sponsors from the partner community to expand its tour; and access to the VMware Express will be prioritized based on partner status and/or sponsorship.

VCP410 Test Passed - Waiting for Official Notification


With the VCP410 test in the books, I'm now waiting for official notification from VMware of my VCP4 status. According to my "Examination Score Report" I should receive notice from VMware within 30-days having met all of the requirements for "VMware Certified Professional on vSphere 4 Certification" and testing above the Certified Instructor minimums.

As a systems and network architect, I found the "interface related questions" somewhat more challenging than the "design and configure" related fare. However, the test was pretty well balanced and left me with well over 25 minutes to go back over questions I'd checked for review and finalize those answers. I logged-out of the exam with 18 minutes left on the clock. My recommendation to those looking to pass the VCP410:

  1. Work with vSphere in a hands-on capacity for several days before taking the test, making good mental notes related to interface operations inside and outside of vCenter

  2. Know the minimums and maximums for ESX and vCenter configurations

  3. Understand storage zoning, masking and configuration

  4. Go over the VCP blueprint on your own before seeking additional assistance

  5. Remember the test is on GA release and not "current" release so "correct" answers may differ slightly from "reality"

  6. Get more than 2.5 hours sleep the night before you take the exam

  7. Schedule the exam in the morning - while you're fresh - not the afternoon following meetings, etc.

  8. Dig into topics on the VCP Forum online


That about does it for day number three in Las Vegas, Nevada. It's time to shuffle-up and deal!

Monday, January 25, 2010

VMware View 4, Certified HCL Tripples in Size

In the past month, the number of hardware Thin and Zero clients certified for VMware View 4.0 has nearly trippled. It only seemed fitting to update our list to further showcase the current state of the View "certified" HCL for "hardware" thin clients. The "ThreadX" OS variants include hardware from Teradici (TC1100) to accelerate the PCoIP protocol. 

As of January 26, 2010, the following hardware clients (average price of $526/unit) are "officially" on VMware's HCL:


OEMModelOSSupportsUnit CostNew Since 
  VariantPcoIP(Est. $)Dec-09
Amulet HotkeyDXR4-iPThreadXY
(quad-head video)
TBDY
Astec Technology Co.A3520Linux Embedded for Thin Client b1106YTBDY
Astec Technology Co.A3580Windows XPe SP2YTBDY
ClearCubeC7420ThreadXY$1,160 Y
ClearCubeI9420ThreadXYTBDY
DELLOptiPlex FX160Windows XPe SP2Y$512 N
DevonITTC10ThreadXY$342 Y
DevonITTC5Windows Embedded Standard 2009Y$299 N
HPGT7720Windows Embedded StandardY$799 N
HPt5545HP ThinProY$296 Y
HPt5630Windows XPe SP3Y$632 N
HPt5630WWindows Embedded StandardY$440 N
HPt5720Windows XPe SP3Y$410 (refurbished)N
HPt5730Windows XPe SP3Y$349 N
HPt5730WWindows Embedded StandardY$550 N
HPt5740Windows Embedded StandardY$429 N
HPvc4820tWindows Embedded StandardYN/AY
IGELUD2-420 ESWindows Embedded StandardN$436 Y
IGELUD2-420 LXIGEL Linux 4.02.500N$292 Y
IGELUD3-420 ESWindows Embedded StandardY$561 Y
IGELUD3-420 LXIGEL Linux 4.02.500Y$412 Y
IGELUD3-720 ESWindows Embedded StandardY$561 Y
IGELUD3-720 LXIGEL Linux 4.02.500Y$436 Y
IGELUD5-420 ESWindows Embedded StandardY$627 Y
IGELUD5-420 LXIGEL Linux 4.02.500Y$579 Y
IGELUD5-720 ESWindows Embedded StandardY$653 Y
IGELUD5-720 LXIGEL Linux 4.02.500Y$605 Y
IGELUD7-720 ESWindows Embedded StandardY$1,042 Y
IGELUD7-720 LXIGEL Linux 4.02.500Y$925 Y
IGELUD9-720 ESWindows Embedded StandardY$953 Y
Leadtek Research Inc.WinFast VP200 PThreadXY$715 Y
PraimXP-6700Windows XPe SP3YTBDY
PraimXP940-IWindows XPe SP3NTBDY
PraimXP9400-UWindows XPe SP3YTBDY
PraimXT900-IThinOX 8.01.14NTBDY
SamsungSyncMaster NC190ThreadXY$467 Y
SamsungSyncMaster NC240ThreadXY$524 Y
WyseC90LEWWindows Embedded Standard 2009Y$498 N
WyseP20ThreadXY$585 Y
WyseR50LSUSE Linux Enterprise TC 10Y$481 Y
WyseR50LESUSE Linux Enterprise TC 10Y$442 Y
WyseR90LEWWindows Embedded Standard 2009Y$640 N
WyseR90LWWindows Embedded Standard 2009Y$593 N
WyseS10WTOS 6.5N$252 N
WyseV10LWTOS 6.5N$315 N
WyseV10L Dual DVIWTOS 6.5N$447 N
WyseX50LSUSE Linux Enterprise TC 10Y$671 Y

 SOLORI's NOTE: The Samsung NC190 and NC240 include integrated 19" and 24" monitors, respectively. This combination makes them the most cost and energy efficient PCoIP solutions on the market. If all-in-one products meet your deployment profile, the Samsung units are worth a serious look.

Devices not on this list may "work" with VMware View 4.0 but may not support all of View 4's features. VMware addresses certified and compatible as follows:
Certified and Compatible Thin Clients:
Certified - A thin client device listed against a particular VMware View release in the Certified For column has been tested by the thin client manufacturer against that specific VMware View release and includes a minimum set of features supported in that VMware View version.

Compatible - A thin client device certified against a specific VMware View release is compatible with previous and subsequent VMware View releases according to the compatibility guarantees published as part of that specific VMware View release (typically two major releases in both directions). However, a compatible thin client may not include all of the features of the newer VMware View release. Please refer to your VMware View Client documentation to determine which features are included.

Unlisted thin clients may embed VMware's "software client" along with a more general purpose operating system to deliver View 4 compatibility. Support for this class of device may be restricted to the device vendor only. Likewise, thin clients that are compatible with earlier versions of View may support only a subset of View 4's features. When in doubt, contact the thin client manufacturer before deploying with View 4.

Friday, January 15, 2010

Quick-Take: It's Time to Upgrade from ESX to ESXi

That's right, I said upgrade from ESX to ESXi - not ESX 3.x to vSphere, but ESX (any version) to vSphere's ESXi! Ever since VMware PartnerExchange 2009 (April), SOLORI has been advising clients and prospects to focus on ESXi and move away from ESX-based hosts - you know, the one with the "Linux" service console. Personally, I'm glad VMware has strengthened their message about the virtues of ESXi and the direction of their flagship product.
ESXi has a superior architecture and we encourage customers to deploy ESXi as part of any new vSphere deployment. Our future posts will compare ESX 4 and ESXi 4 in detail on topics like hardware compatibility list, performance, and management to demonstrate that ESXi is either on par with or superior than ESX. But for now, here are some key points you should know about ESXi vs. ESX:

  1. The functionality and performance of VMware ESX and ESXi are the same; the difference between the two hypervisors resides in their packaging architecture and operational management. VMware ESXi is the latest hypervisor architecture from VMware. It has an ultra thin footprint with no reliance on a general-purpose OS, setting a new bar for security and reliability (learn more).

  2. In the future, ESXi’s superior architecture will be the exclusive focus of VMware's development efforts.

  3. New and existing customers are highly encouraged to deploy ESXi. Many Fortune 100 companies have already standardized on the ESXi platform.


- VMware Blog, June, 2009


Not unfamiliar with the VI3 version of ESXi, its ease of installation, configuration and management and smaller footprint, I was one of about 10 participants in an "ESXi BoF Breakout Session" with Charu Chaubal of VMware. While discussing vSphere's ESXi with Charu, I never heard the words "ESXi is a superior architecture," but I did get a clear message that ESXi was the way of the future. From that point on, it seemed as though any efforts concentrated on (net new) ESX deployments was going to be "time wasted."

However, it was clear by the whispered tone about ESXi's virtues that the timing was not right for the real message to be spoken aloud. Remember, this was the launch of vSphere and "ESXi" was strongly associated with "ESXi Free" - not a clear marketing message when license sales and adoption curves are on the line. Perhaps that's why the "talking points" at PEX2009 always suggested that ESX was the "flagship" hypervisor and ESXi was "targeted for embedded and OEM" deployments.

In practical terms, migration from ESX 3.x to vSphere/ESXi didn't make a lot of sense for many large or institutional customers at the time due to the lack of third-party driver parity between ESX and ESXi in vSphere. However, for net new installations where thrid-party drivers and service console agents were not a concern, the message about ESXi's superiority was getting lost. Thomas Paine once said "what we obtain too cheap, we esteem too lightly" and I'd attribute the slow uptake on ESXi to the perception that it was somehow inferior to ESX - a misconception owed to it being offered in a "free" version.
Price is what you pay; value is what you get.

- Warren Buffet


By Warren Buffet's standards, ESXi is a tremendous value. For the novice entering bare-metal virtualization for the first time, the relative ease with which ESXi installs to a USB flash drive allows for a trial experience that is both quick and reassuring. I'd argue that ESXi's tiny memory footprint and generous hardware support make it the easiest platform for testing bare-metal virtualization. As I've blogged about, ESXi takes about 14 minutes to install to USB flash - from initial CD-ROM boot to configuration console.

Anyone experienced with ESX will have encountered service and performance affecting IRQ sharing issues with the service console. The hours discovering, tracking and mitigating these kinds of issues after a BIOS update or hardware refresh can never be reclaimed. The fact is these problems simply do not exist for ESXi - something many ESXers will appreciate.

I've attended a great deal of WebEx sessions on VMware products over the last year and I'm still hearing hushed tones and uncertainty about the role of ESXi versus ESX. To be clear, ESXi is being talked about as "enterprise ready," but much of the focus is still on ESX. These overtones were still present in an "vSphere: Install, Configure and Manage" course I recently attended to qualify for VCP410. While our instructors were very knowledgeable and experienced, there seemed to be much less confidence when discussing ESXi versus ESX. In fact, the lab guide clearly states:
If you are new to VMware vSphere and you do not have any special needs for more advanced features, use ESXi.

- Page 599, Module 13, Installing VMware ESX and ESXi


The manual - and VMware's choice of message here - seems to indicate that ESX has "more advanced features" than ESXi. While the "advanced features" VMware is talking about are service console related, it leaves many regarding ESXi as the inferior product in sharp contrast to today's message. If the statement "ESXi’s superior architecture will be the exclusive focus of VMware's development efforts" isn't writing on the wall for the rest of you, here's a list of VMware's new talking points on ESXi:

  • Improved Reliability and Security

  • Fewer Patches

  • Less Disk Space

  • Streamlined Deployment and Configuration

  • Reduced Management Overhead

  • Next Generation Hypervisor

  • Superior Architecture

  • Drastically Reduced Hypervisor Footprint

  • Smaller Code Base, Smaller Attach Surface

  • Certified on over 1,000 Server Systems - including USB keys

  • New, Operating System Independent


In contrast, the ESX platform is being re-imaged. Here are some new talking points about ESX:

  • The Older Architecture

  • Relies on Linux OS for Resource Management

  • 20x Larger on-disk Footprint

  • More Complex to Configure

  • Console OS Administration for Configuration and Diagnostics

  • Prone to Arbitrary Code Execution (Console OS)


For many of us familiar with both ESXi and ESX, nothing here is really new. The only real change is the message: build your eco-system around ESXi...

SOLORI's Take: It's clear to me that VMware took inventory of its customers and chose to lead with ESX when vSphere was released. I suspect this was a practical decision due to the overwhelming numbers of ESX hosts already installed. However, the change in marketing and positioning we're witnessing signals that we're moving toward a time when ESX will be openly considered a dead-end variant.

When will ESX be phased-out? That's up to market forces and VMware, but the cloud loves efficiency and ESXi is certainly more resource efficient and compartmentalized than its brother ESX. Furthermore, VMware has to maintain two development and support chains with ESX and ESXi and Darwin likes ESXi. If I had to bet, I wouldn't put my money on seeing an ESX version of the next major release. In any case, when ESX is gone VMware can stop having to make excuses for the "linux console" and the implications that VMware is somehow "based on Linux."